Thursday, September 20, 2012

Zucchini with Onion & Brown Sugar

IMG_5467eThis month for the Improv Cooking Challenge our hostess Kristen of Frugal Antics of a Harried Homemaker asked the participating bloggers to make any recipe of their choosing using the two given ingredients of zucchini & brown sugar.  My first thought of course was a zucchini cake as I have a lovely and delicious recipe but as I’ve been trying to avoid carbs and Maisie with her allergies can’t have it and well, Eammon just doesn’t need it… I decided to go in a different direction.  I found a recipe on Sarah’s blog, My Culinary Sanctuary for Zucchini Squash and Onions with Brown Sugar and it sounded and looked delicious so I figured I’d give it a try. 

IMG_5463eThe recipe was simple enough.  I just chopped up an onion and a nice big zucchini fresh from the garden and then it was an easy sauté to an absolutely wonderful end.  I honestly didn’t know if this recipe would be a hit or not but I was blown away with how delicious such a simple recipe could be.  The onions were sweet, the flavor of the zucchini shone through and the touch of butter gave the sauce a velvety mouth feel.  The brown sugar didn’t make the recipe sweet but just seemed to enhance the natural sweetness of the ingredients.  I highly recommend that you give this recipe a try, you won’t be disappointed.

My previous Improv Cooking Challenge entries:

August 2012  Tomatoes & Peppers:  French Fries Hash Browns 
July 2012  Corn & Butter:  Fritos Crusted Pollock 
June 2012  Cherries & Almonds:  Dried Cherry Almond Tart 
May 2012  Strawberries & Cream:  Strawberry Soup 
April 2012  Peanut butter & Jelly:  Peanut Butter & Jelly Bars 
March 2012  Potato & Cheese:  Loaded Potato & Buffalo Chicken Casserole 
February 2012  Ginger & Carrots:  Shrimp & Avocado Salad with Carrot Ginger Dressing 
January 2012 Lemon & Sour Cream:  Ponderosa Lemon & Sour Cream Tart 
December 2011 Eggnog & Cranberries:  Eggnog Popovers with Cranberry Butter 
November 2011 Pumpkin & Cream Cheese:  Praline Pumpkin Cheesecake 
October 2011 Caramel & Apples:  Caramel Stuffed Apple Cider Cookies

IMG_5466eZucchini with Onion & Brown Sugar (very slightly adapted from here)

Slice the onion and zucchini.  In a large frying pan over medium heat, melt the butter.  Add the onions and let them cook until they start to caramelize.  Add the zucchini, salt, pepper & Whey Low Gold or brown sugar.  Mix everything well, cover and let cook for 20 minutes, stirring occasionally.  After 20 minutes remove the lid and if there is a large amount of liquid, cook uncovered for a few minutes allowing the liquid to reduce, (I did not have much liquid so I skipped that step.)

Enjoy! 

Wednesday, September 12, 2012

Crispy Zucchini Chips

IMG_5411eI have been promising a friend, ever since I had her try my Crispy Zucchini Chips, that I would post the recipe so here it is, finally!  I’ve been seeing all sorts of veggie chips all over the internet and when I pulled a giant zucchini from our garden I decided to give it a go.  I tried a few different methods, baking in the oven, using the crisper pan in the convection/microwave but what I found worked best was just using the straight microwave. 

IMG_5388eThe process was super simple, I used my mandolin to thinly and evenly slice the zucchini.

IMG_5395eOn a microwave safe plate, sprayed with cooking spray, I laid the zucchini slices so that they were not overlapping.  I lightly spayed a bit more cooking spray on top of the zucchini and a super light dusting of sea salt then into the microwave.

IMG_5397eIn my microwave it took 6 minutes, 20 seconds and I had perfectly crisp and golden chips.  I’ll tell you that these chips are totally addictive and the fact that I got as many on the plate to photograph as I did is amazing as I thought that I was eating them as quickly as they were coming out of the microwave.  I’ve made a few batches thus far and the ones that I don’t devour immediately I store on the counter sealed in a Lock & Lock.  As I said, these chips were a huge success with everyone and what an easy and great way to eat your veggies.  I hope that you’ll make these Crispy Zucchini Chips and that you and your family enjoy them as much as we do.

IMG_5409eCrispy Zucchini Chips

Using a mandolin, thinly and evenly slice the zucchini.  Spray a microwave safe plate with cooking spray and lay a single layer of zucchini on the plate without overlapping the slices.  Lightly mist the top of the zucchini with additional cooking spray and very lightly dust with sea salt (use a lot less salt than you think you’ll need as the flavor will concentrate as the zucchini cooks)  Microwave for approximately 6 minutes, until the zucchini is crisp and golden.  Remove to another plate to cool.  Once cool store in a sealed container at room temperature.

Enjoy!

Monday, September 3, 2012

Fried Green Tomatoes

IMG_0598eDo you remember your first time?  Okay get your head out of the gutter, I’m talking about the first time you ate something that totally rocked your world?  Well for me it was the first time I tried a fried green tomato and I still remember the experience vividly.  I had recently made the move from New England to the south and was living down the road from Marietta Square where on the weekends the Marietta Square Farmer’s Market was held.  I loved to wander up there to pick up fresh veggies, baked goods and other treats.  On one of my very first visits there was a vendor selling tomatoes and in his stall he was cooking up samples of fried green tomatoes.  They smelled absolutely wonderful but when he told me what they were, I honestly turned my nose up at them…but the smell…well I just had to take a taste and WOW, they were absolutely magical.  How is it that Southerners have been eating and enjoying Fried Green Tomatoes forever but us Northerners seemed to know nothing about them?  Is the secret of Fried Green Tomatoes kept from us Northerners as a way to one-up us after the whole North vs. South conflict?  Well no matter the reason, since that fateful day this former Northerner has delighted in eating Fried Green Tomatoes, usually at my favorite little lunch spot in the form of their Fried Green Tomato Sandwich.  

IMG_5400e Now though, thanks to Amanda’s blog Dancing Veggies my Secret Recipe Club assignment this month, I have a super awesome recipe for fried green tomatoes.  I enjoyed reading through Amanda’s blog, trying to figure out songs based on the lyrics she uses as blog titles and of course reading her recipes.  Amanda’s recipes were mostly vegetarian and I found them inviting as they were simple to make and used everyday ingredients.  While I realized that I really stank at figuring out most of the songs, I found that I was really good at wanting to try many of her recipes including her Zucchini Parmesan Crisps, Slow Cooker Coconut Curry and Slow Cooker Eggplant Korma but as soon as I saw her fried green tomato recipe it was all over, I knew what I’d be making…Plus I had a garden which was overflowing with tomatoes, red & green…how perfect was that! 

IMG_0594eThe Fried Green Tomatoes I made were absolutely delightful and brought back wonderful memories of that first one I tried years ago at the Farmer’s Market.  The crunchy coating on the tomato was a bit gritty from the cornmeal and was a wonderful contrast to the tomato itself which was smooth and al dente and provided the perfect resistance to the bite though it had been cooked through.  The flavor of the tomato was delicate and just a tad tart which worked beautifully with the slight little kick and heat from the cayenne in the coating.  I’ll admit it, the first time I made these tomatoes I ate almost all of them myself and it wasn’t that no one else wanted or liked them but it was because I didn’t want to share.  In the end, over the course of the month since I first received my assignment, I made three batches of Fried Green Tomatoes so that others could enjoy them too.  Me, I adore Fried Green Tomatoes, I could eat Fried Green Tomatoes daily for the rest of my life and I also found that I love Fried Green Tomatoes however they are served, hot, room temperature and even cold from the fridge, anyway you slice the green tomato I’m addicted.  If there’s a support group for my Fried Green Tomato addiction I don’t want to know.  So happy that I moved to the South, not only did I get away from snow in the winter but I also found a new love, Fried Green Tomatoes …total YUM!! 

IMG_0599eFried Green Tomatoes (slightly adapted from here)
  • 6 large green tomatoes, sliced 1/2 in thick
  • 2 eggs
  • 1/2 cup buttermilk (I prepare from powered as I don’t keep fresh buttermilk in the house and this always works wonderfully)  
  • 3/4 cup corn meal 
  • 1/3 cup flour 
  • 1 1/2 tsp. cayenne powder  
  • 1/2 tsp. sea salt   
  • 1/2 tsp. fresh ground pepper
  • peanut oil or oil of your choice

In a large cast iron skillet heat about 1/4-inch of oil over medium high heat. 

In a wide shallow bowl whisk together the eggs & buttermilk.  In a separate dish combine the corn meal, flour, cayenne, salt & pepper.  One at a time dip the tomato slices in the egg mixture then lay in the corn meal mixture and cover the tomato completely with the coating..

Once the oil is hot, add the coated tomatoes to the hot oil being sure not over crowd the pan. Cook the tomatoes until golden brown on both sides, trying to only turn one time once the bottom side is cooked and golden. Remove from the oil allowing all the excess oil to drain back into the pan and then place the tomato slices on a wire cooling rack which is covered with a paper towels.  Season with salt.  Serve hot, warm or cold, any way you eat them they are delicious!

Enjoy!

My previous Secret Recipe Club Recipe Posts:

Chicken Satay Noodle Salad 
Double Chocolate Mousse Cake 
Candied Popcorn
Fruit, Nut & Poppy Seed Chicken Salad 
Broiled Sushi 
Health(ier) Peanut Brittle 
Crunchy Fudgy Heart Bites 
Texas Chicken with Lime Butter 
Pork Belly Soup with Collard Greens 
Thin Mint Irish Coffee 
Levain Chocolate Chip Walnut Cookies 
Welsh Cakes 
Nutella Crêpes 
Cilantro Lime Chicken 
Holy Guacamole 
and
Home Style Chicken Curry

Secret Recipe Club

Thursday, August 30, 2012

Bacon & Cheese Zucchini Fritters

IMG_5379eYesterday I pulled a giant zucchini from the garden which was the length and girth of Eammon’s forearm.  I’ve been in the mood for Zucchini Fritters and I’ve made them in the past but I wanted to do something a bit different so decided to change up my recipe a bit by adding bacon and cheese and I also omitted the flour as I’m trying to avoid carbs.  These fritters were tender and full of wonderful flavor.  The funny thing about them though, everyone thought that they were eating potato pancakes as they really tasted almost like stuffed potato skins.  I wish that I had had some sour cream to top the fritters as I think that would have been the perfect finishing touch.  I’d bet if you wanted to fool some veggie hating adult or child into thinking that they’re eating potato, just take off the green skin of the zucchini and they’ll never know that they’re eating a healthy vegetable.  These were delicious hot last night but I enjoyed them even more as leftovers for breakfast this morning.  

IMG_5385eBacon & Cheese Zucchini Fritters

  • 3 cups grated zucchini
  • 1 medium sweet onion, grated
  • 3 large eggs
  • 1 cup grated sharp cheddar cheese
  • 1/2 cup bacon bits 
  • 1/2 tsp sea salt 
  • 1 tsp. freshly ground black pepper
  • peanut oil or oil of your choice

Add the grated zucchini and grated onion to a cheesecloth lined sieve and squeeze & press out as much of the water as possible. In a large bowl add the squeezed out zucchini & onion, eggs, grated cheese, bacon bits, salt & pepper.  Stir to combine well.

Heat a large cast iron skillet over medium high heat and add just enough oil to coat the bottom of the pan.  Using a large cookie scoop portion out the zucchini mixture into the hot pan, being careful not to over crowd the pan.  Press and spread the zucchini mixture just a little.  Cook until the bottom side is golden and then carefully flip to cook the other side.  Once both sides are golden remove to a paper towel lined cooling rack.  Serve hot or as I prefer, chilled for breakfast the following morning.

Enjoy!

Saturday, August 25, 2012

Toasted Sesame Ginger Salmon with Sesame Ginger Honey Glaze

IMG_5337eI don’t remember how I happened upon Jessica’s blog How Sweet It Is but once there I was immediately drawn to her recipes, especially her Toasted Sesame Ginger Salmon as her pictures had me wanting to lick my computer screen.  So as I do, I saved her recipe to my ever expanding “need to make file.”  Then I was emailing with my bloggy pal Colleen and she mentioned that this week she was making my Coriander Roasted Salmon with Cilantro Yogurt Sauce and that got me in the mood for some salmon.  Though my Coriander Roasted Salmon with Cilantro Yogurt Sauce is one of my favorites I remembered that I had Jessica’s recipe saved and other than the salmon, I thought that I had everything in the house* so that’s the direction I went. 

I of course changed Jessica’s recipe a bit by upping some of the flavors and to better fit with my diet I reduced the oil and made sugar free substitutions for the honey and brown sugar.  I also used salmon with skin and made sure to crisp it up as Eammon loves salmon skin.  So how did it turn out?  Well oh my word this salmon was a huge hit, moist, flavorful and wonderfully delicious.  Maisie loved the sweetness of the glaze and ate a huge portion, as large as mine.  Eammon and I loved it too and were both picking at the scraps on the baking sheet, enjoying every last bit.  I made two large filets so I had one left over and the following day we enjoyed the leftovers, Maisie and Eammon ate it heated and I loved it cold, flaked on a salad with a bit of the glaze used as dressing.  The day after we finished both filets I asked Maisie what she wanted for dinner and she asked for more salmon!!  I will be making this salmon again and again and very soon as it was totally delicious and a winning recipe in all our books.

*  I thought that I had all the ingredients in the house, including fresh green onions but that wasn’t to be so I had to pull some from the freezer so they look a bit limp on the salmon.  Oh well, still delicious.

IMG_5334eToasted Sesame Ginger Salmon with Sesame Ginger Honey Glaze (adapted from here)

Toasted Sesame Ginger Salmon

Line a baking sheet with aluminum foil and spray with cooking spray.

In a large bowl or baking dish, combine the sesame oil, vinegar, Whey Low Gold, soy sauce, garlic, ginger & ground pepper and whisk well until combined. Add salmon to the dish or place everything in a Ziplock bag, then refrigerate and marinate for 30 minutes.

Preheat the broiler in your oven to high and move the rack as close to the broiler coils as possible.

Remove salmon from the marinade and place skin side up on the prepared pan and then place directly under the broiler. Cook for 5 minutes until the skin is crispy.  Remove from broiler and turn the filets over.  Top with some of the marinade, getting as much of the minced garlic and ginger on to the salmon as possible.  Return the salmon to the broiler for approximately 5 more minutes until the inside of the salmon is opaque and easily flakes with a fork.

Serve immediately topped with some toasted sesame seeds, green onions and some of the Sesame Ginger Honey Glaze  (below)

Sesame Ginger Honey Glaze

Combine all the glaze ingredients in a bowl and whisk until smooth. Pour over salmon.

Enjoy!

Monday, August 20, 2012

Thai Curry Shrimp with Shirataki Noodles

IMG_2834eAges and ages ago I saw a recipe on Catherine’s blog Weelicious for Thai Curry Cellophane Noodles and because of the flavors of the ingredients I knew that it would be a winning recipe in our home so I tucked it away in my “need to make” file.  It took a while to actually make her dish but oh am I ever glad that I did because it was a huge success with all of us and even better, with very minor changes it was not only safe for Maisie’s allergies but it also fit in with my diet of avoiding carbs and sugar.  Honestly right off the top it was Maisie “safe” but to make it fit better into my diet I substituted Catherine’s bean thread noodles with Shirataki Noodles which contain no carbs or calories and in texture are very similar to the bean thread noodles!  This dish was simple to make, delicious and honestly really good cold as I finished the leftovers for breakfast…Shhhhh…  This recipe is a keeper and will be made time and time again.

IMG_2821eThai Curry Shrimp with Shirataki Noodles (adapted from here)  

Drain and rinse the noodles very well.  I generally allow them to soak in some water for a few minutes and then rinse a few times.

In a bowl combine the cornstarch and coconut milk and set aside.  Heat oil in a wok or large sauté pan over medium heat, add onions and sauté until translucent, about 3-4 minutes.  Add the red bell peppers, garlic, ginger, scallions, salt and curry powder and sauté another 2-3 minutes.  Add the shrimp and cook for 3-4 minutes, stirring continuously.  Add the coconut milk mixture, lime juice, fish sauce and cilantro and stir to mix.  Heat through until mixture starts to thicken up.  Add the drained noodles and stir for another minute or until noodles are coated with the sauce and heated through.

Enjoy!

Saturday, August 18, 2012

Soup day

IMG_3062eWhen my reserve of Cheaters Chicken Soup starts to run low I know that it’s time for a full day of chicken roasting and soup making.  I recently happened upon a great sale on chicken, both on whole chickens and leg quarters so I stocked up and made a day of it.   

IMG_3018eTen pounds of leg quarters and twenty seven pounds of whole chickens, ready to become “Rotisserie” Chicken.

IMG_3026eAfter five hours in the oven the entire house smelled delicious.  The skin was crispy and the meat, juicy and tender.  I let everything cool enough so that I could easily handle it.  I then got to work and put into separate bowls, the skin, the white meat and the dark meat.  I put all the bones and pan juices into a huge stockpot and along with some vegetables and garlic I rendered everything I could from the bones before discarding them, and made my Cheaters Chicken Soup. 

IMG_3053eI don’t like to let anything go to waste especially when I can make it into something wonderful.  So I slowly cooked up the skin in a fry pan until it was delicious crackling, a perfect crunchy topping for the soup.

IMG_3055eMy freezer is now nicely stocked with the roasted chicken meat and plenty of Cheaters Chicken Soup. Using my FoodSaver I packaged the chicken meat in one pound portions so it’s ready to be used in soup or other recipes.  The Cheaters Chicken Soup I packaged two cups to a bag and froze the bags flat so that’s now available to pull out to use in recipes or for when we want a nice bowl of homemade soup.  I’ll tell you, all the soup served us well recently when Maisie had her surgery and Eammon had pneumonia as both only wanted soup to eat for a few days.  I was happy to eat the soup plain and Maisie & Eammon enjoyed it with the addition of some chicken and rice noodles.

From my original 37 pounds of chicken I ended up with:

8.2 pounds of roasted dark meat

4.6 pounds of roasted white meat

10.1 ounces of crackling and

Over 3 gallons of Cheaters Chicken Soup, fifty-one cups to be exact.

Not bad for less than $25 and a days work.

Enjoy!

Thursday, August 16, 2012

French Fries Hash Browns

IMG_5271eLast December when we were in Aruba with my parents, my Mom was trying to use up all the food we had in the kitchen before heading back to the states.  In the freezer was a bag of French fries which most likely would have gone uneaten had she not diced them up and fried them up with some onions & garlic, making boring old fries into a wonderful little side dish.  Well they were really good and I remember that dish each time I have leftover fries so that’s how this recipe was born.

IMG_5237eThis month for the Improv Cooking Challenge our hostess Kristen of Frugal Antics of a Harried Homemaker asked the participating bloggers to make any recipe of their choosing using the two given ingredients of tomatoes & peppers.  What perfect ingredients as I have a bounty of both tomatoes and peppers coming daily from my garden.  I love being able to walk outside, pick fresh veggies and eat or use them in a recipe within minutes, so perfectly fresh. Where last month I struggled with what to make for the challenge, this month I knew immediately as this recipe is something that I make for Eammon’s breakfast quite often and I pair it with some perfectly cooked over-easy eggs.  It’s a great way to use up leftover French fries and also get a little bit of veg into him.  The other nice thing about these hash browns is that I use what I have on hand and no matter what variation I make, he always enjoys it.  Next time you have leftover French Fries I hope that you’ll give this recipe a try.

My previous Improv Cooking Challenge entries:

July 2012  Corn & Butter:  Fritos Crusted Pollock 
June 2012  Cherries & Almonds:  Dried Cherry Almond Tart 
May 2012  Strawberries & Cream:  Strawberry Soup 
April 2012  Peanut butter & Jelly:  Peanut Butter & Jelly Bars 
March 2012  Potato & Cheese:  Loaded Potato & Buffalo Chicken Casserole 
February 2012  Ginger & Carrots:  Shrimp & Avocado Salad with Carrot Ginger Dressing 
January 2012 Lemon & Sour Cream:  Ponderosa Lemon & Sour Cream Tart 
December 2011 Eggnog & Cranberries:  Eggnog Popovers with Cranberry Butter 
November 2011 Pumpkin & Cream Cheese:  Praline Pumpkin Cheesecake 
October 2011 Caramel & Apples:  Caramel Stuffed Apple Cider Cookies

IMG_5267e French Fries Hash Browns
  • Olive oil
  • 1/2 medium sweet onion, diced
  • 5 banana peppers, sliced into rings
  • 1/2 jalapeno, seeds removed, finely minced
  • 1 cup coarsely diced leftover oven baked French fries
  • 2 thick slices salami, diced
  • 1 cup cherry tomatoes
  • salt & pepper to taste

Heat a large cast iron skillet or frying pan over high heat and add enough olive oil to lightly coat the bottom of the pan.  Add the onions, banana peppers, jalapeno, French fries and salami and cook, stirring often until everything starts to lightly caramelize an then add the tomatoes.  Cook until the tomatoes start to pop and caramelize. Add salt & pepper to taste.  Serve with a gorgeous fried egg.

Enjoy!

Friday, August 10, 2012

Petit Amuse

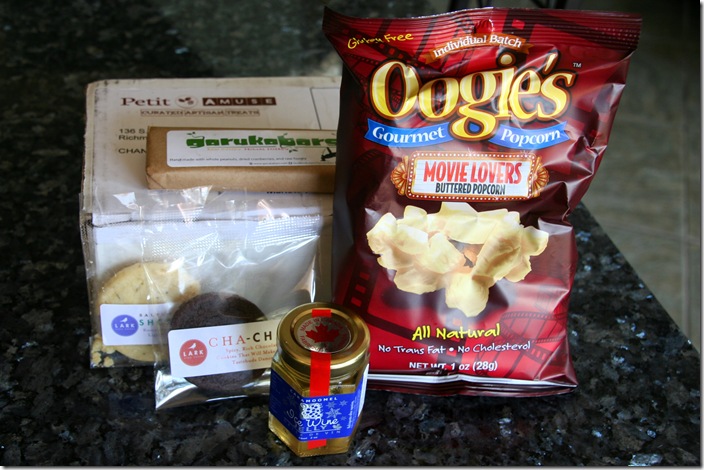
IMG_5147eDo you love receiving packages in the mail?  Well I do,so when I was contacted by Ben Appenzeller one of the founders of a new company Petit Amuse and asked if I would like review their site and receive a free sample package I of course said yes.  Petit Amuse was founded by Ben Appenzeller and Dr. Rosemary KuI and they search out the best artisan food producers that you've never heard of and give you a taste of what you didn't even know you were missing.  Their mission is to highlight these small independent food producers and help food lovers discover artisan treats which they may not be able to find locally by bringing the world to your door one bite at a time.  

Petit-Amuse  noun  \pə-ˈtētˈ ä-ˌmüz\

Also known as amuse-bouche. A French term that literally means "mouth amusement."These are tiny bites of food served before a meal to whet the palate and invigorate the appetite. They're more whimsical than hors d'oeuvres, and smaller than appetizers.

For foodies this is such a fun idea and for only $10/month customers can subscribe to receive sample boxes which contain 3-4 samples of specialty foods each month. It's a great deal and I was super excited to receive my package in the mail and we’ve had fun trying treats which we would not have had the opportunity to try.  Now Petit Amuse doesn’t profit from these sample boxes, they work directly with the producers to get samples at cost, they cover their own expenses like shipping and then distribute them to you with no additional mark-up and most of the sample boxes have a retail value of well over $10 (often closer to $20).  Petit Amuse is betting on the fact that sample box subscribers will love what they try and want to purchase more through their marketplace so that pushes them to pick only the best, most unique products to include in their sample boxes

So what delicious and unique treats did I receive?

Garuka Bars ~ Garuka bars are all natural and made with only 8 ingredients: Vermont raw honey, peanut butter, 7 whole-grain flakes, dried cranberries, brown rice puffs, light brown sugar, whole peanuts, and a teeny tiny bit of Vermont’s own Cabot butter., Garuka bars’ natural raw honey sweetener provides long lasting consistent energy, which means it’s a great source of pre-exercise carbs and they’re totally delicious!

Oogies Gourmet Popcorn ~ I received a bag of Oogies Movie Lovers Buttered Popcorn.  Now I adore popcorn and it’s a go-to treat in the Cook Lisa Cook house so trust me when I say, I know my popcorn and this stuff was buttery delicious.  Now I want to try some of Oogies other flavors like their new Hatch Chili Con Queso popcorn…doesn’t that sound awesome.

Caramoomel Ice Wine Jelly ~ I have enjoyed some wonderful ice wine through the years and how fun to have it in a jelly.  Since my package was delivered on a scorching hot Georgia day, my jelly was liquid in a jar but after a night in the fridge it was jelled again and perfectly delicious.  I enjoyed the jelly as a fancy-schmancy afternoon treat with some wonderful cheese.

I also received a little taster of Lark Fine Foods cookies ~ both their Cha Chas & Salted Rosemary Shortbread.  While I loved the chocolate Cha Chas which had a nice little spice to them it was the Salted Rosemary Shortbread which was my favorite and yes I did put a little of the Ice Wine Jelly on the Shortbread and it was awesome. 

I loved my box and it was fun trying out some new and different artisinal products and I’m looking forward to trying more in the future.

If this interests you, check out Petit Amuse and their sample boxes or you can purchase the items I reviewed and more unique products at their online marketplace. You can also “like” Petit Amuse on facebook, or follow them on twitter.

Enjoy!

Tuesday, August 7, 2012

Mini Cheesecake Bites

IMG_5164eWho doesn’t just love cheesecake?  I know that it’s a favorite of mine and always has been so I was very excited that our Crazy Cooking Challenge hostess Tina, of Moms Crazy Cooking chose cheesecake for this month’s challenge.  The way that the Crazy Cooking Challenge works is that each month there is a dish that our hostess Tina challenges the participating bloggers to make.  We all go out searching for what we think is the ultimate recipe for that dish and once we find it, we make it and then all on the same day we do our post featuring the recipe.  Sadly, this is the twelfth and final month of the Crazy Cooking Challenge.  It’s been fun participating for all these months and I’m looking forward to hopefully taking on a new cooking challenge in the coming months.

Growing up my Mom used to make wonderful little cookies and pastries for holidays and one of my favorites were her Mini Cheesecake Bites.  Though I have changed her recipe a bit over the years with my changing tastes and diet, these are still totally awesome and remind me very much of my Mom’s wonderful Mini Cheesecake Bites.

IMG_5143eCrusts ready for the oven.

IMG_5144eI added the cream cheese mixture and they’re ready to bake.

IMG_5160eBaked, chilled, decorated and delicious!

Oh and my secret, I love these best straight from the freezer…total YUM!

IMG_5164e Mini Cheesecake Bites

Preheat oven to 375F. Lay the sliced almonds on a foil lined baking sheet and bake until they start to get toasted.  Remove from oven and allow to cool.  Add the toasted almonds to the bowl of a food processor and using the pulse action, process until they are finely ground.  Add the butter, 2 packets of Stevia and the cinnamon and process until well combined. 

Line mini muffin tins with 36 mini muffin liners and add 1/2 teaspoon of the almond crust mixture to each.  Lightly press the mixture into the bottom of each muffin cup.  Bake for 5 minutes and then allow to cool.

While the crusts are baking and cooling add the cream cheese, egg, 6 packets of Stevia, vanilla bean paste & sour cream to the bowl of a stand mixer and blend until perfectly smooth.  Top each crust with the cream cheese mixture, filling the cup almost to the top.  Bake for 12-15 minutes until the mini cheesecakes are puffed and just starting to get golden on the top.  Remove from the oven and cool completely in the muffin tins. Once cool, remove the cheesecake bites from the pan and refrigerate or freeze.  To serve, top with a piece of candied cherry. 

Enjoy!

My previous Crazy Cooking Challenge entries:

Fried Chicken Challenge:  Copycat “KFC” Original Recipe Fried Chicken **Voted the ULTIMATE recipe of the challenge** 
Smoothie Challenge:  Mango Melon Banana & Chia Smoothie 
Grilled Cheese Sandwich Challenge: Totally Outrageous Jalapeno Popper Grilled Cheese Sandwich 
Blueberry Muffins Challenge:  Skinny Blueberry Lemon Poppy Seed Muffins 
Spaghetti with Red Sauce Challenge:  Tomato Sauce with Onion & Butter 
Chocolate Cake Challenge:  Double Chocolate Meyer Lemon Mousse Cake 
Chicken Noodle Soup Challenge: Thai Chicken Noodle Soup 
Fudge Challenge: Biscoff Fudge 
Mashed Potato Challenge: Aloo Tikki 
Chocolate Chip Cookie Challenge: Chocolate Chip Gingersnaps 
Mac & Cheese Challenge: Velvety Mac & Cheese


Photobucket

Monday, August 6, 2012

Chicken Satay Noodle Salad

IMG_5135e I have been participating in The Secret Recipe Club since June of last year and still each month I’m excited to receive my assignment so I can immediately start stalking my assigned blog searching for the recipe I want to make and feature.  This month was no different and when I received my assignment of Barbara’s Barbara Bakes I immediately started perusing her extensive list of recipes.  Finding the “one” recipe that I wanted to make was quite difficult as Barbara’s recipe list is quite extensive and so many caught my eye including zucchini bacon & cheese fritters, her braised beef short ribs and funeral potatoes (because the one time I had them they were oh-so-delicious) or one of her Daring Cooks recipes, boeuf bourguignon…yum!  Then there was her Cafe Rio sweet pork barbacoa which really called my name because I LOVE eating at Cafe Rio when I’m out visiting friends in Utah, it’s my favorite and one day I will make Cafe Rio’s sweet pork barbacoa as well as the other recipes which I bookmarked from Barbara’s site.  In the end I decided to make Barbara’s chicken satay noodle salad, a perfect meal for a hot Georgia summer night. 

IMG_5136eBecause I can never leave any recipe as it is, I did make a few changes to Barbara’s recipe but really so that it fit better with our diets and just little taste changes.  For the taste changes I used cilantro instead of parsley because I love the flavor of cilantro with satay and then as Barbara didn’t specify a hot pepper sauce I decided to use two different ones, Thai Garlic Chili Pepper Sauce and Sriracha.  To fit better with our diets I omitted the oil, used sugar free honey and I switched out Barbara’s whole wheat spaghetti for Shirataki noodles as I’m avoiding carbs and with Maisie and her allergies, the Shirataki noodles fit both our diets.

This dish easily came together as I had most of the ingredients in the house and this recipe was a perfect way to use some of the chicken I froze the last time I made my “Rotisserie” Chicken.  Also, since I decided to make this as a cold noodle salad it all came together in one bowl so my clean up was easy-peasy.

This recipe was simple and delicious with the wonderful contrasting sweet, sour, salty & spicy flavors that I love in Thai food.  This salad was a hit with all of us and I can see it gracing our table many nights to come.

IMG_5140e Chicken Satay Noodle Salad (adapted from here)

In a large bowl whisk together the peanut butter, honey and tamari.  Add the lime juice & zest, hot pepper sauces and garlic then whisk until smooth.  Add the noodles, carrots and chicken and fold to mix.  Gently fold in the spinach, green onions, peanuts & cilantro.  Top with additional cilantro and peanuts for serving.

Enjoy!

My previous Secret Recipe Club Recipe Posts:

Double Chocolate Mousse Cake 
Candied Popcorn
Fruit, Nut & Poppy Seed Chicken Salad 
Broiled Sushi 
Health(ier) Peanut Brittle 
Crunchy Fudgy Heart Bites 
Texas Chicken with Lime Butter 
Pork Belly Soup with Collard Greens 
Thin Mint Irish Coffee 
Levain Chocolate Chip Walnut Cookies 
Welsh Cakes 
Nutella Crêpes 
Cilantro Lime Chicken 
Holy Guacamole 
and
Home Style Chicken Curry

Secret Recipe Club
Related Posts with Thumbnails