Showing posts sorted by relevance for query lemon. Sort by date Show all posts

Tuesday, February 7, 2012

Double Chocolate Meyer Lemon Mousse Cake

IMG_3150eIt’s Crazy Cooking Challenge time again and this month our hostess Tina of Moms Crazy Cooking challenged the participating bloggers to search non-celebrity blogs looking for the ultimate chocolate cake recipe.  Once we find what we think is the ultimate recipe we are to make and feature that recipe and the blog where we found it.  I posted recently in my Dark Chocolate Dipped Candied Lemon Peel post that since making my Ponderosa Lemon & Sour Cream Tart I’ve been on a major lemon kick so when I saw Mimi’s Double Chocolate Tangerine Mousse Cake I knew immediately that I could tweak the recipe a bit switching out the tangerine for lemon and I could get my tangy lemon fix, still meet the requirements of making a chocolate cake while also making the ultimate chocolate cake.

IMG_3146eThis cake used both white and dark chocolate and that combined with tangy lemon, well it was exactly what I had been craving.  The chocolate cake is flourless so it’s dense and rich.  The mousse uses gelatin which is something that I haven’t done before but it seemed to help the mousse keep it’s shape but the mousse remained light, soft, rich and creamy.  Everyone who tried the cake thought it was beautiful and adored the rich flavors…and they were rich so small slices are a must.  If you adore dark chocolate and lemon like we do, I think you will find this to be a favorite in your home too.

My previous Crazy Cooking Challenge entries:
Chicken Noodle Soup Challenge: Thai Chicken Noodle Soup
Fudge Challenge: Biscoff Fudge
Mashed Potato Challenge: Aloo Tikki
Chocolate Chip Cookie Challenge: Chocolate Chip Gingersnaps
Mac & Cheese Challenge: Velvety Mac & Cheese 

IMG_3149eDouble Chocolate Meyer Lemon Mousse Cake  (Adapted from here)

Cake
1 cup butter
9 oz. dark chocolate chips
3/4 cup sugar
5 large eggs
1/2 cup ground toasted walnuts

Mousse
1 cup fresh Meyer lemon juice
1/3 cup lemon sugar syrup from making the Dark Chocolate Dipped Candied Lemon Peel
2 1/2 teaspoons unflavored gelatin
12 oz. white chocolate chips 
6 TBS sour cream
2 cups chilled whipping cream

Garnish:
Dark Chocolate Dipped Candied Lemon Peel
walnut halves, toasted

For Cake:
Preheat oven to 325°F. Butter an 8-inch round cake pan with cutter and then dust with cocoa powder.  Melt the butter and chocolate chips in a microwave safe bowl, checking and stirring often until smooth.  Whisk in the sugar, eggs and ground nuts. Pour the batter into prepared pan. Bake the cake until a toothpick inserted into center comes out with very moist crumbs attached, about 45 minutes. Cool completely on rack (cake will fall and crack).  Once cool, using the pan’s cutter release the cake from the pan.

Lightly brush the sides of a 10-inch springform pan with vegetable oil. Set the cooled cake in center of pan (there will be space around cake that will be filled in with mousse). Refrigerate cake.

For Mousse:
Place 3 TBS of the lemon juice in a small bowl and sprinkle in the gelatin. Let stand for 10 minutes to allow the gelatin to soften.  Meanwhile, simmer the remaining lemon juice and lemon sugar syrup, stirring until combined, about 3 minutes.  Add the gelatin mixture to the lemon juice mixture and stir to dissolve.  Add 12 ounces white chocolate and whisk over low heat just until melted.  Remove from heat and whisk in the sour cream. Pour the lemon white chocolate mixture into a large bowl. Chill the mixture until cool and thickened but not set, whisking occasionally, about 1 hour 45 minutes.

Beat the chilled whipping cream to stiff peaks. Fold into the lemon white chocolate mixture. Pour the mousse over the chocolate cake in the springform pan, covering the top and sides completely. Refrigerate cake overnight.

Run a small sharp knife around pan sides to loosen cake. Release pan sides. Place cake on platter. Garnish as desired.

Enjoy!

Photobucket

Monday, February 4, 2013

Lemon Almond Biscotti

IMG_6579eIt’s Secret Recipe Club time again, one of my favorite times of the month.  I love receiving my secret cooking pal assignment, going through their blog, checking out all their recipes, choosing one to make and feature and of course reveal day is best of all as I we all post and see what everyone has made.  This month my assignment was to cook from Kate’s Food Babbles.  I have been a reader of Kate’s blog for a while as I not only participate in the Secret Recipe Club with her but we also both participate monthly in the Improv Cooking Challenge.  I also “know” Kate from the lovely and kind comments she always leaves on my challenge recipes.  Kate’s blog is filled with so many gorgeous food photos, I just wanted to make everything,  I think that this month I was craving sugar as I had a real rough time deciding on a recipe.  I narrowed it down to Kate’s peppermint patties, maple bacon caramel corn, bacon caramel tart, potato chip cookies, Mexican hot chocolate and her Lemon Biscotti. In the end the biscotti won out as I had everything in the house and I’ve also been craving lemon, but trust me, a few others from the list will be made soon. 

I’ve made biscotti in the past and both Eammon and I love them with our tea and coffee but I’ve never made them with a citrus and as I’ve been craving lemon, these biscotti were just perfect.  I changed Kate’s recipe a little, really just bumping up the lemon a bit with the addition of lemon extract and in place of her almond extract I used vanilla bean paste and then to get that bit of almond flavor back in, I chose to add toasted slivered almonds.  These biscotti were simple to make, super crunchy, the lemon flavor really shined through and the combo of the lemon, almonds and white chocolate was light and delicious.  These biscotti were a big hit here in the Cook Lisa Cook home and I’m looking forward to making more of Kate’s delicious recipes.  Hop over to Kate’s blog to check out the original recipe and all of her other wonderful treats.

IMG_6585eLemon Almond Biscotti (slightly adapted from here) 

Preheat oven to 375F. Line a baking sheet with a Silpat or parchment paper and set aside.  In a medium mixing bowl, whisk together the flour and baking powder and set aside.

In the bowl of a stand mixer fitted with the whisk attachment, combine the eggs, sugar, vanilla bean paste, lemon extract, lemon zest and lemon juice. Whisk at medium speed for about 5 minutes, or until the mixture thickens and holds its shape.  Using a silicone spatula, fold the flour mixture into the egg mixture and then fold in the slivered almonds.

On a lightly floured surface, with damp hands, divide the dough into 2 portions and shape each into a 3-inch diameter log.  Transfer the logs to the prepared baking sheet, spacing evenly.  Bake for 16 minutes, or until lightly browned.  Remove from oven and let cool for 10-15 minutes on the baking sheet.  Reduce oven temperature to 300F.

With a sharp slice each log into ½”-thick slices.  Arrange cookies, cut sides up, in a single layer on a Silpat or parchment paper lined baking sheet.  Bake until firm, about 20 minutes, flipping midway through baking.  Cool completely. They will get crunchier as they cool.

Line a cool baking sheet with a Silpat or parchment paper. Set aside.

Chop the white chocolate and place in a glass or metal bowl. Place the bowl over a pot of barely simmering water. Do not let the bowl touch the water. Stir until the chocolate is smooth and melted.  Dip the bottoms of the biscotti into the melted chocolate and place on the parchment lined baking sheet. Allow the chocolate to set completely.

Store in an airtight container up to one week.

Enjoy!

My previous Secret Recipe Club Recipe Posts: 

Creamy Mints 
Thai Peanut Noodles with Chicken 
Baked Buffalo Chicken Wings 
Fried Green Tomatoes 
Chicken Satay Noodle Salad 
Double Chocolate Mousse Cake 
Candied Popcorn
Fruit, Nut & Poppy Seed Chicken Salad 
Broiled Sushi 
Health(ier) Peanut Brittle 
Crunchy Fudgy Heart Bites 
Texas Chicken with Lime Butter 
Pork Belly Soup with Collard Greens 
Thin Mint Irish Coffee 
Levain Chocolate Chip Walnut Cookies 
Welsh Cakes 
Nutella Crêpes 
Cilantro Lime Chicken 
Holy Guacamole 
and
Home Style Chicken Curry


Secret Recipe Club

Sunday, January 8, 2012

Glazed Lemon Squares

IMG_0471eLemon Bars, when made well, are one of my favorite cookies and I thought that there could be none better than the tried and true buttery and tangy delicious Lemon Squares that I have been making for years because they are the bomb.  But then somewhere I saw a recipe for glazed lemon bars and I realized that I could improve on my favorite Lemon Squares by doing away with the powdered sugar topping and replacing it with a sweet lemony glaze.  Oh JOY!!!  I loved the extra tang of lemon in the sweet glaze and didn’t miss the powdered sugar mess down the front of my shirt and everywhere else.  NOW I make a the most perfect and delicious Glazed Lemon Squares ever!!

IMG_0474eGlazed Lemon Squares

Dough:
2 cups all-purpose flour
1/2 cup confections sugar
1 cup butter

Preheat oven to 350F. Mix sugar and flour then cut in butter until particles are the size of small peas. Work dough with hands and press in the bottom and 1 1/2-inches up the sides of a lightly greased 13x9-inch glass pan. Bake for 15 minutes or until firm to the touch.

Filling:
1/4 cup flour
1 tsp. baking powder
4 large eggs
2 cups granulated sugar
1 1/2 TBS grated lemon peel
5 TBS fresh lemon juice

While crust is baking, mix flour & baking powder and set aside. In a separate bowl, beat eggs until frothy. Stir in sugar, lemon peel, lemon juice and flour mixture. Pour mixture onto hot crust. Bake 25 minutes or until set and top is slightly browned. Cool completely before topping with the glaze.

Glaze:
1 cup powdered sugar
3 TBS fresh lemon juice

Whisk together the powdered sugar & lemon juice until smooth and then gently spread over the bars. Refrigerate for at least two hours and then cut into squares before serving. Makes about 36 bars.

Enjoy!

Thursday, January 19, 2012

Ponderosa Lemon & Sour Cream Tart

IMG_3008eThis is month four of the Improv Cooking Challenge which is hosted by Kristen of Frugal Antics of a Harried Homemaker.  This month I was super excited to participate as we were tasked to use two of my favorite ingredients, lemon and sour cream.  How the challenge works is, each month the participating bloggers are given two ingredients and asked to make any recipe of their choosing which contains those two ingredients.  Well I have been looking forward to this month because not only are lemon & sour cream personal favorites but for almost a year I’ve been itching to make this tart from Mary’s blog, One Perfect Bite and this was the perfect opportunity.  I have previously cooked from Mary’s blog with great success, when I made Stir-Fried Asparagus with Water Chestnuts, Ginger & Cashews so had high hopes for this recipe.  This tart not only lived up to my expectations but it far exceeded them.  This tart was absolutely delicious and both Eammon and I couldn’t stop eating it and the entire tart barely lasted a day.  Okay I did share a couple of slices with some friends, who also loved it but Eammon and I managed to polish off the lion’s share.

IMG_2966eQuite fortuitously this ponderous Ponderosa lemon magically appeared on my doorstep just a couple of days before I made my tart.

IMG_2977eThis gorgeous almost 2 1/2 pound Ponderosa lemon was a surprise gift from fellow bloggers Alyson & Ford.  It was a great treat as I’ve never heard of nor tried this lemon before and not only did it have wonderful flavor but this baby gave me two full cups of juice!

IMG_2980eMary said in her post “The crust is as negotiable as your standards. It need not be homemade and a really good commercial crust or puff pastry will work just fine.”   I debated on the crust for a while, undecided on whether to go with a graham cracker, shortbread or just a pie crust…until I remembered that I had some homemade pie crust dough in the freezer so easy-peasy I went that route.

IMG_2985eThis tart was super simple to make and oh-so delicious. The lemon & sour cream together were gorgeous and the tart was tangy, creamy and silky smooth, just pure perfection. This tart will be made again and again as this was a winning recipe.

My previous Improv Cooking Challenge entries:
October 2011 Caramel & Apples:  Caramel Stuffed Apple Cider Cookies
November 2011 Pumpkin & Cream Cheese:  Praline Pumpkin Cheesecake
December 2011 Eggnog & Cranberries:  Eggnog Popovers with Cranberry Butter

IMG_3006ePonderosa Lemon & Sour Cream Tart  (from here) 

1 9-inch pie or tart crust
1/4 cup cornstarch
1 cup sugar
1 TBS finely grated lemon zest
1/2 cup lemon juice
3 egg yolks, beaten
1 cup milk
4 TBS butter
1 cup sour cream

Preheat oven to 400F.  Line a tart pan with pastry and trim edges.  Prick the bottom & sides with a fork.  Bake until light golden brown, about 20 minutes.  Remove from the oven and cool to room temperature.

In a saucier combine the cornstarch, sugar, lemon zest, lemon juice, egg yolks and milk.  Cook on medium heat until thick, stirring constantly.  Stir in the butter until fully combined and let the mixture cool to room temperature.  Stir in sour cream and pour filling into the tart shell.

Refrigerate for at least 4 hours.  The tart can be refrigerated for up to 24 hours.  Top with fresh lemon zest, berries or whipped cream.

Enjoy!

Thursday, February 2, 2012

Dark Chocolate Dipped Candied Lemon Peel

IMG_3113eI’m on a bit of a lemon kick right now.  After the totally awesome Ponderosa Lemon & Sour Cream Tart which I made for my last Improv Cooking Challenge I’ve just wanted more tangy lemon desserts.  For my upcoming Crazy Cooking Challenge I managed to find a dessert which includes lemon and still meets the criteria for the challenge.  This post is a bit of a sneak preview for that challenge which will post this coming Tuesday.

IMG_3118eAll I can say right now is that my Crazy Cooking Challenge recipe includes these delicious Dark Chocolate Dipped Candied Lemon Peels and that it’s lucky that any of them made it onto the dessert as I swear, every time I walked by the tray of these I’d grab one or two to snack on.  The combination of the dark chocolate and the chewy sweet and tangy lemon peel is pure perfection.

You can use any lemon of your choice but I chose Meyer lemons because the rind is so thin so I didn’t have to work at peeling away the white pith.

IMG_3112eDark Chocolate Dipped Candied Lemon Peel

8-10 Meyer lemons
2 cups water
2 cups sugar
extra sugar for dipping (about 1 cup)
3 oz. dark chocolate chips
2 - 3 tsp. Crisco solid shortening

Cut the lemons in half and using a lemon reamer juice the lemons.  Remove the remaining fruit pulp and as much of the white pith as possible using a spoon or butter knife.  Cut the rind into strips.  In a medium saucepan bring the water to a boil and add the lemon peels. Boil for about 5 minutes until tender. Remove the peels from the water and stir in the 2 cups of sugar until dissolved. Return the sugar water to a boil and add the peels.  Reduce the heat to a simmer and cook the peels uncovered until transparent and tender, about an hour. Using a slotted spoon remove the peels from the sugar syrup and lay the peels out on a Silpat or parchment paper lined baking sheet.  Allow the peels to dry uncovered overnight.  Reserve the lemon syrup to use in other recipes or to sweeten tea.

Place about one cup of sugar in a small bowl (add more if necessary.)  Dredge the dried peels in the sugar until they are coated and place them on a Silpat or parchment paper lined baking sheet.  Place the sugar coated peels in a warm 100F oven and allow them to dry out for about an hour or allow to sit overnight uncovered on the counter. 

Once the peels are dry, melt the chocolate and stir in a bit of Crisco to thin it out a bit. Dip the peels 2/3 –3/4 of the way up into the melted chocolate.  Lay on a Silpat or parchment paper lined baking sheet and allow the chocolate to harden.  Store the candied peel in a dry location and if you can keep from snacking on them, they’ll stay for a few weeks.

Enjoy!

Saturday, April 7, 2012

Skinny Blueberry Lemon Poppy Seed Muffins

IMG_3762eI seem to have an addiction, but it’s not what you might think.  It’s not to muffins, blueberries or even to my much adored lemon, it’s an addiction to my monthly recipe challenges, The Secret Recipe Club, The Improv Cooking Challenge and today’s Crazy Cooking Challenge.  Here’s why I say that I have an addiction… The way that the Crazy Cooking Challenge works is that each month there is a dish that our hostess Tina, of Moms Crazy Cooking challenges the participating bloggers to make.  We all go out searching non-celebrity blogs looking for what we think is the ultimate recipe for that dish and once we find it, we make it and then on the same day we do our post featuring the recipe and the blog where it was found.  Well this month we were challenged to find the ultimate blueberry muffin recipe.  Sounds easy enough as the internet is littered with food bloggers who have posted gorgeous blueberry muffin recipes to their blog so finding one is up to what really just suits your fancy.  My problem though is that I’m anaphylaxis allergic to blueberries so as a general rule, I don’t cook with them.  But…BUT… I have participated in the Crazy Cooking Challenge since the beginning and I just couldn’t miss a month, so I was going to make it work.

IMG_3680eMy friend Lisa (yes Lisa is a popular name) is doing Weight Watchers (and doing great at it I might add) and she recently had surgery so while she was recovering I brought her dinner one night.  For her meal I decided to make Slimmed Down Loaded Potato & Buffalo Chicken Casserole and I also wanted to bring her some WW friendly sweet treats.  I decided that her sweet treats would be my blueberry muffin challenge.  Up front I knew that I wasn’t going to use fresh or frozen blueberries but rather blueberry yogurt as I felt it would be safer for me.  I then set out searching the internet looking for my, well really Lisa’s, not me Lisa but friend Lisa’s, ultimate blueberry muffin recipe.  I knew that the recipe I would choose needed to include yogurt and because of Lisa’s diet I wanted to avoid recipes which included a lot of oil, butter or eggs.  In my search I decided to look for recipes which included yogurt (my blueberry addition) and applesauce in place of the fat and as far as the sugar, well that I knew I could easily substitute.  When I happened upon Ruth’s She-Fit.com and her Skinny Lemon Poppy Seed Muffins, well I knew that I had found my recipe.  I’ve heard that lemon and blueberry go fabulously together and with Ruth’s recipe all I had to do was swap out her lemon yogurt for my blueberry yogurt, easy-peasy!!  I held pretty true to Ruth’s recipe just switching out the yogurt flavor and I didn’t bother with the additional sprinkling of Splenda on top of the muffins.

IMG_3741eAs the muffins cooked the house smelled absolutely delicious and I do wish that I was able to sample one of the muffins but Maisie (because of her food allergies) and I (because of my blueberry allergy) had to just watch as Eammon was our taste tester. 

IMG_3748eThe results, both Eammon and Lisa had thumbs up for this recipe and said that even though it’s skinny and healthy you’d never know it as these muffins were moist, tender, delicious and full of flavor.  Sounds like a winner to me!

IMG_3768eSkinny Blueberry Lemon Poppy Seed Muffins   (Adapted from here)

Preheat oven to 350F.  In a medium bowl mix the flour, baking powder, salt, baking soda and Splenda together.  Add the yogurt, lemon juice and applesauce, lemon peel and poppy seeds.  Stir to combine.  This will make a very thick batter.  In a separate bowl whip the egg whites to stiff peaks.  Add the egg whites to the flour mix and fold in.  Spray a muffin tin with non-stick cooking spray.  Using a large cookie scoop place approximately 1/4 cup of batter into each muffin mold.  Bake for approximately 20-25 minutes, until a tooth pick inserted in the muffin comes out clean.

Enjoy!

My previous Crazy Cooking Challenge entries:

Spaghetti with Red Sauce Challenge:  Tomato Sauce with Onion & Butter 
Chocolate Cake Challenge:  Double Chocolate Meyer Lemon Mousse Cake
Chicken Noodle Soup Challenge: Thai Chicken Noodle Soup 
Fudge Challenge: Biscoff Fudge 
Mashed Potato Challenge: Aloo Tikki 
Chocolate Chip Cookie Challenge: Chocolate Chip Gingersnaps 
Mac & Cheese Challenge: Velvety Mac & Cheese

Photobucket

Tuesday, October 20, 2009

Coriander Roasted Salmon with Cilantro Yogurt Sauce

IMG_7212 The other night I was reading though a few of my favorite cooking blogs when I happened upon this recipe and knew that I had to make this dish. I made a few changes to the original, tweaking amounts a little to better suit our tastes. I also left out the dill, which I despise, and the bell peppers which I'm not oh-to-fond of. In addition I had ground coriander in the house and couldn't be bothered to toast and grind my own so another change from the original.

This was one of the best meals I have cooked in a while as Eammon and I both loved the dish. The fish had a wonderful flavor and was super moist. The lemon rind in the sauce added a wonderful brightness while the sauce overall had great complexity. This recipe was easy, delicious, and will be made numerous times in the future.

Coriander Roasted Salmon with Cilantro Yogurt Sauce (Adapted from here)

Sauce
1 cup plain fat-free yogurt
2 tablespoons tahini
1½ teaspoon ground coriander
1 tablespoon fresh lemon juice
1 large garlic clove, minced
zest from ½ of a lemon, minced
¼ cup chopped fresh cilantro
Salt and pepper

Salmon
2 tablespoons honey
2 tablespoons fresh lemon juice
4 garlic cloves, minced
1 tablespoon olive oil
1 teaspoon paprika
1 tablespoon ground coriander
6 (5- to 6-ounce) skinless salmon fillets, I used Steelhead salmon
Salt and pepper

Cilantro for garnish

To make the sauce: Stir the yogurt, tahini, coriander, lemon juice, garlic, and lemon zest together in a small bowl. Mix in the cilantro. Season with salt and pepper to taste. Refrigerate until ready to use. (Can be prepared to this point up to 1 day ahead.)

To prepare the salmon: Whisk the honey, lemon juice, garlic, olive oil, paprika & coriander together in a shallow baking dish. Add the salmon and turn to coat it. Cover and refrigerate for 15 minutes and up to 1 hour.

Preheat the oven to 400 degrees. Line a large baking sheet with foil and spray with cooking spray. Transfer the salmon to the prepared baking sheet and roast in the oven until the salmon is opaque in the center, about 10 minutes.

Serve the salmon with the yogurt sauce and garnish with cilantro.

Serves 6

I served the salmon over roasted spaghetti squash. To make the squash, preheat oven to 375°F. Cut squash in half lengthwise and scrape out the seeds and pulp. Line a baking sheet with foil and spray with cooking spray. Place the squash cut side down on the prepared baking sheet and roast uncovered for 30-45 minutes or until fork inserts easily into the flesh. Separate strands by running a fork through the flesh in the "from stem to stern" direction.

Enjoy!

Wednesday, January 22, 2014

Coconut Crusted Tilapia in a Coconut Garlic Lemon Sauce

Coconut Crusted Tilapia w Coconut Garlic Lemon SauceA fast but fancy, perfect for family or company, delicious way to enjoy tilapia or other white flaky fish.  The fish cooks quickly in a pan making a crunchy delicious crust while keeping the fish moist and tender.  The coconut milk adds a creaminess to the strong lemon garlic sauce without adding dairy so perfect for everyone in our home with diets and allergies.  Interestingly we all love this fish freshly made but I think we like it even better the second day.  Got to love easy leftovers! 

Coconut Crusted Tilapia in a Coconut Garlic Lemon Sauce

Sauce

Rinse and with paper towels, pat dry the filets and then season with 1/2 tsp. salt and fresh cracked pepper. Set aside.  Prepare 3 shallow bowls.  In the first mix the arrowroot, garlic and onion powders. In the second bowl, lightly whisk the eggs and water together. In the third bowl, mix the shredded coconut, paprika, thyme, and 1/2 tsp. salt.

In a large skillet, melt 1-2 TBS. of coconut oil over medium-high heat. Lightly dredge the fish in the arrowroot mixture, shaking off any excess. Then dip the fish in the egg mixture and finally dredge it in the coconut mixture, again shaking off any excess.  Lay the filet carefully in the hot pan. Repeat with the remaining pieces.

Cook until you see the edges of the filets turn opaque and the bottom crust is golden brown and crispy, then carefully turn the filets allowing the second side to crisp and brown.  Do not over-cook as you want to keep the fish moist.  Add additional coconut oil if necessary. Once cooked, remove the fish to a plate.

In the hot pan add the minced garlic and sauté quickly until fragrant but not browned.  Add the lemon juice and stir in any remaining crunchy bits in the pan.  Add the coconut milk and stir well.  Simmer the sauce until reduced and it thickly coats the back of a spoon.  Remove from the heat and stir in the parsley and season to taste with salt & pepper.  Plate the fish and top with the sauce.

This was served with a delicious and perfect accompaniment, Coconut Carrot Soufflé, click on the link for the recipe.

Enjoy!

Saturday, June 19, 2010

Zucchini Lemon Cookies

IMG_1734We are loving all the zucchini I am harvesting from the garden and so far all the recipes using the fresh zucchini have been a hit.  Maisie asked for some cookies so in another attempt to use some of the zucchini and get some extra veggies into all of us, I decided to make cookies.  These cookies were delicate, delicious, just a touch sweet and loved by everyone.

Zucchini Lemon Cookies

For the Cookie:

  • 3/4 cup butter
  • 3/4 cup sugar 
  • 1 egg
  • zest of two lemons
  • juice of 1 lemon
  • 2 1/2 cups flour 
  • 1 tsp baking powder 
  • 1/4 tsp salt
  • 2 cups shredded unpeeled zucchini
  • 1 cup coarsely chopped walnuts 

For Glaze:

Preheat oven to 375 degrees. Cream together the butter and sugar. Add egg the egg, lemon zest and juice and mix well. Add flour, baking powder & salt and stir well to mix. Stir in the zucchini and nuts. Using a 2 Tablespoon scoop, scoop out cookies onto Silpat or parchment lined cookie sheets. Bake for 10 minutes until bottoms are just slightly golden.

While cookies are baking, stir together the glaze ingredients, sugar and lemon juice, until smooth.

Once the cookies are finished baking, remove to a wire cooling rack and while still hot, frost and add the decorative sprinkles then allow to cool completely.

Enjoy!!

Wednesday, February 22, 2012

Baked Egg & Avocado

IMG_3239e Not only have I lately been on a lemon kick with my Glazed Lemon Squares, Ponderosa Lemon & Sour Cream Tart, Dark Chocolate Dipped Candied Lemon Peels and my Double Chocolate Meyer Lemon Mousse Cake but I’ve also been on a major avocado kick, adding it to a lot of salads, sandwiches, soups and other dishes.  A while back I saw a picture of an egg baked in an avocado (sorry I don’t remember where so as to give credit) and the other morning I awoke dreaming of it so I had to make it.  IMG_3222eI cut an avocado in half, removed the pit and scooped out a bit of the flesh to make room for the egg.

IMG_3227eObviously I didn’t quite scoop out enough as my egg runneth over.  No worries though as I just used what my avocado could hold. I added salt and pepper and then I carefully transferred the egg filled avocado to the hot pan in the oven,

IMG_3234eHot and delicious straight from the oven.  The white was nicely set, the the yolk was still soft and a bit runny and the warm avocado was creamy…pure deliciousness!


IMG_3241eBaked Egg & Avocado
for each serving:

  • 1/2 an avocado, pitted and some of the flesh removed to make room for the egg
  • 1 small or medium egg
  • salt & pepper to taste

    Place a heavy bottomed oven safe pan in the oven and heat to 425 F.  Fill the prepared avocado with an egg and add salt & pepper to taste,  Once the oven is hot carefully transfer the filled avocado halves to the hot pan.  Cook for 10 minutes or until your eggs are at the firmness you desire.

Enjoy!

Monday, February 13, 2006

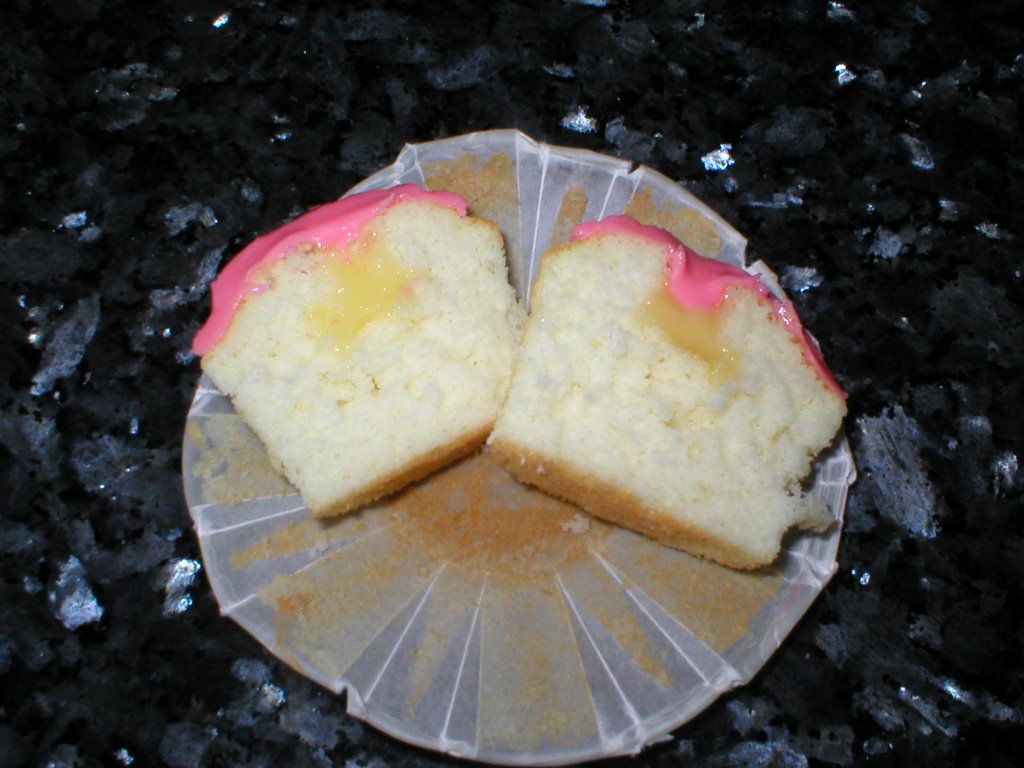
Love Cakes filled with Lemon Curd

Make your favorite white cake recipe (box or scratch) as cupcakes. Fill the cup papers only half way as you need room in the cups to add the glaze later. Bake and cool completely.

Lemon curd recipe is here, make and cool completely. Or you can use store bought.

Put cooled lemon curd in a piping bag fitted with a large open star tip. From the top center of each cupcake, insert the tip and squeeze in a small amount of lemon curd.

I don't have a recipe or amounts, but the glaze is just icing sugar, lemon extract, some food coloring and water. Just mix to a thick glaze and spoon quickly on to top of cakes so that it settles nice and smooth. If the icing starts to get too thick, thin with a little more water. Allow icing to dry at room temp. for a few hours. Refrigerate.

If you make these delicious cakes, be sure to post pics and let me know how they turn out.

Enjoy!!

Friday, July 20, 2007

Lemon squares


Dough:

2 c. all-purpose flour
1/2 c. confections sugar
1 c. butter

Preheat oven to 350F. Mix sugar and flour then cut in butter until particles are the size of small peas. Work dough with hands and press in the bottom and 1 1/2-inches up the sides of a lightly greased 13x9-inch glass pan. Bake for 15 minutes or until firm to the touch.

Filling:

1/4 c. flour
1 tsp. baking powder
4 lg. eggs
2 c. granulated sugar
1 1/2 Tbs. grated lemon peel
5 Tbs. fresh lemon juice
confectioners sugar, for dusting.

While crust is baking, mix flour & baking powder and set aside. In a separate bowl, beat eggs until frothy. Stir in sugar, lemon peel, lemon juice and flour mixture. Pour mixture onto hot crust. Bake 25 minutes or until set and top is slightly browned. Cool completely before cutting. Dust top with additional confectioners sugar.

Sunday, October 6, 2013

Fijian Ceviche ~ Kokoda

1385395_10151965017876663_541994582_nThis month for Secret Recipe Club I was able to pretend that I was on an exotic island enjoying an incredibly delicious meal.  Well other than the less than turquoise waters in our backyard, we were able to sit on our dock, under the nice warm Georgia sun and enjoy this delicious Fijian Ceviche and for just that little while, we were transported to that island. 

1384245_10151965018046663_1878201323_nNow that I’m off of my delightful, though delusional island time, let me fill you in on the details.  This month for Secret Recipe Club I was assigned the blog Easily Good Eats.  This blog is loaded with wonderful recipes.  I started scrolling through the recipe index, looking at the usual cookies, brownies, breads, fish & meats but when I came upon the headings of exotic and unusual…well that totally caught my interest.  It didn’t take long to choose a recipe because as soon as I read the recipe for Kokoda (Fijian Ceviche) I knew I had found a winner…and a total winner it was,  We love ceviche and this one with the addition of coconut cream just brings it to a whole different level.  I actually made this recipe within 24 hours of receiving my assignment and since then I have made it three additional times…yes, it is that good!!  I hope that you’ll give this Fijian Ceviche a try and transport yourself to a wonderful and delicious paradise.

1381355_10151965018106663_624852851_nFijian Ceviche ~ Kokoda (adapted from here)

  • 12 oz. monk fish, or other firm white fish, shrimp and bay scallops work well too 
  • 5 TBS. fresh lemon juice
  • 1/2 cup finely died onion
  • 1TBS. finely diced red jalapeno
  • 1 TBS. finely diced green jalapeno
  • 1 TBS. coconut butter
  • 2 TBS coconut milk   
  • 1/2 cup small diced tomato (fresh) 
  • Salt & freshly ground black pepper

Cut the fish into 1/2 inch cubes.  Place the fish, lemon juice, onions and jalapeno in a large ceramic or glass bowl and toss to combine. Cover and place in the fridge for 8 hours or overnight to marinate, stirring occasionally. The fish will be white when ready.

Just before serving pour off the lemon juice and accumulated liquid.  Stir together the coconut butter and coconut milk and gently stir into the fish mixture, season to taste with salt and pepper.  Gently stir in the tomatoes.

Enjoy!

My previous Secret Recipe Club Recipe Posts: 

Carrot & Sweet Potato Pancakes   
Chicken Burgers with Spinach & Mushrooms 
Paradise Mango Curried Shrimp 
Laura Goodenough’s Apple Coffee Cake 
Loaded Potato Soup
Lemon Almond Biscotti 
Creamy Mints 
Thai Peanut Noodles with Chicken 
Baked Buffalo Chicken Wings 
Fried Green Tomatoes 
Chicken Satay Noodle Salad 
Double Chocolate Mousse Cake 
Candied Popcorn
Fruit, Nut & Poppy Seed Chicken Salad 
Broiled Sushi 
Health(ier) Peanut Brittle 
Crunchy Fudgy Heart Bites 
Texas Chicken with Lime Butter 
Pork Belly Soup with Collard Greens 
Thin Mint Irish Coffee 
Levain Chocolate Chip Walnut Cookies 
Welsh Cakes 
Nutella Crêpes 
Cilantro Lime Chicken 
Holy Guacamole 
and
Home Style Chicken Curry


Secret Recipe Club
Related Posts with Thumbnails