Showing posts with label No Bake. Show all posts

Wednesday, June 24, 2015

Curried Deviled Eggs

1511703_10153463969706663_6496915431054466567_nWe’ve been on a bit of a deviled eggs kick here in the Cook Lisa Cook house as the eggs are a super simple delicious, ready to grab bite, for a meal or a snack.  They’re also a nice treat along with our Chipotle Stuffed Mushrooms to enjoy with a drink on these hot summer afternoons when we’re kicking back and relaxing on our dock doing nothing but looking out at the water and listening to nature.  We’ve continued to enjoy the Sriracha Deviled Eggs but this week decided to change things up a bit and made some awesome Curried Deviled Eggs.  Again, super simple to make and ready to eat at a moment’s notice. 

11377207_10153463969806663_307825590304444136_nCurried Deviled Eggs

In a large pot, bring water to a boil. Carefully add the eggs to the pot and bring the water back to a full boil.  Allow the eggs to boil for 30 seconds. Cover tightly and reduce heat to low so that it’s just at a simmer.  Cook for 11 minutes. Using a large slotted spoon, remove the eggs from the hot water and place in a bowl of ice water.  Allow the eggs to cool for at least 15 minutes before peeling under cool running water.

Once the eggs are peeled, slice in half and remove the yolks to a bowl and place the hollowed out whites on a platter.  Using the tines of a fork, mash the yolks.  Add in the mayonnaise, curry powder, mango chutney and pepper.  Combine until smooth and add salt to taste.  Place the yolk mixture in a piping bag or Ziploc bag fitted with a star or round piping tip.  Fill each egg white with the yolk mixture.  Dust with curry powder.  Serve cold.

Enjoy!

Monday, June 8, 2015

Thai Coffee Frappe

11141192_10153412340876663_4875616280112460535_n Every once in a while we crave a special treat and a Thai coffee is often what is desired. As it's hot outside, we decided to take it one step further and turn that coffee into a Thai Coffee Frappe.  Something a bit different and total deliciousness!!   

11391516_10153412341036663_2885813409639028822_n Thai Coffee Frappe

To the hot coffee, add the coriander, cardamom, cinnamon and vanilla.  Stir to combine and then place covered in fridge overnight (or longer) to cool and for flavors to develop.  When ready to make the frappe, add the spiced coffee, cream, condensed milk and ice to the jar of a blender.  Process until smooth.  Makes 2-3 servings.  Top with whipped cream if desired.  Serve immediately.

Enjoy!

Monday, May 11, 2015

No-Bake Energy Bites

1510576_10153290979066663_8334729665376122679_nIt seems like forever ago, a friend, Alison, posted a recipe on Facebook for these No-Bake Energy Bites and we thought they would be a hit with Maisie.  That thought was immediately confirmed when Alison shared some of the ones she made with Maisie and she begged to make them that very night!  We have made these bites numerous times and they’re still a requested favorite.  They are simple to make and hold up well in her lunch and gym snack bags. 

10649855_10152757584426663_4551740940910109045_nThe original recipe came from Maggie’s blog, Smashed Peas & Carrots, where she states “You can substitute almost anything for any of the ingredients to work around food allergies, special diets, etc. Soybutter, almond butter, cashew butter, sun butter, etc all works in place of peanut butter. You can use creamed or liquid honey, or agave nectar or even maltitol syrup in place of the honey. If you do not like or cannot eat coconut try some type of crushed cereal, wheat germ, whole wheat flour, granola, cocoa powder...the possibilities are really endless. If you cannot find ground flaxseed you can buy it whole and grind it yourself in a coffee grinder or magic bullet or you can substitute any other dry ingredient in it's place. Yes, the mini chocolate chips can be regular sized or carob or you can use raisins, cranberries, goji berries, or crushed nuts (almonds, cashews, walnuts, whatev) of some kind.”  We have stuck to the recipe below because it’s a winner in Maisie’s book but if you try other options, let us know what you did and how they turned out!

10995615_10153290979006663_5629799065036967770_nNo-Bake Energy Bites  (from here)

In a medium bowl, mix everything above together until thoroughly incorporated. Let chill in the refrigerator for half an hour. Once chilled, roll into balls. Store in an airtight container and keep refrigerated for up to 1 week.

Enjoy!

Monday, April 13, 2015

Peppermint Bark

10277526_10153046692751663_7817962646038635387_nFor some reason we have numerous recipes with pictures, which we never got posted to the blog.  Amazing how life, with all its ups and downs, makes time on the computer less and less available.  Need to try harder to get more recipes up so, we’re going to try and get all these older recipes posted and of course all the new and delicious ones too. 

10891955_10153046692896663_771523828393750984_nThis peppermint bark is super simple and a must-have around the holidays.  Yes, we had it back in December and here it is April and we’re just getting it onto the blog!  What’s really nice is that there’s no real cooking involved, it’s all chocolate, so fun to do as a family activity or with the kids.  Messy fingers all around to be cleaned up by hungry mouths. 

10915190_10153046692981663_6447234773647807361_nPeppermint Bark

Line a baking sheet with a Silpat, aluminum foil, or parchment paper.  Place half of the white chocolate in a microwave safe bowl along with 1/2 a teaspoon of the coconut oil.  Melt in 15 second increments, stirring well after each heating.  Heat and stir until smooth, making sure to scrape down the sides of the bowl so no scorching occurs.  Pour the smooth chocolate onto the prepared pan and using an offset spatula, spread to a thin layer.  Place the pan into the refrigerator until the chocolate is ALMOST set, about 15 minutes.  While the first layer is in the refrigerator, heat the dark chocolate along with 1/2 teaspoon of coconut oil in the same manner as the white chocolate.  Spread the dark chocolate over the almost set white chocolate and smooth with the offset spatula.  Again place in refrigerator to allow the dark chocolate to ALMOST set.  Repeat the process with the remaining white chocolate and 1/2 teaspoon of coconut oil.  Once you spread the final layer of white chocolate and smooth, sprinkle on the Andes Peppermint Crunch Baking Chips and press them gently into the melted white chocolate. 

Refrigerate the bark until completely hardened. Once hardened, remove from the pan and peel off the Silpat, aluminum foil or parchment. Break the bark into pieces as large or as small as you want. If you choose to cut into squares, allow the bark to warm to room temperature.  Take a very long, sharp knife and allow it to warm up in a bowl of hot water.  Wipe the water off the knife and then use it to cut the bark.  Between each cut, wipe the knife and reheat it in the water as necessary.

Enjoy!!

Thursday, November 21, 2013

Orange-Car​damom Date Nut Bars

1425540_10152080801316663_706446332_n It’s Improv Cooking Challenge reveal day and this month for the Improv Cooking Challenge our hostess Kristen of Frugal Antics of a Harried Homemaker challenged the participating bloggers to make any recipe of their choosing using the specified ingredients of orange & cardamom.  My very first thought were of some delicious orange & cardamom Christmas cookies which I haven’t had in years, but as I’m not eating wheat, gluten, sugar or sweeteners these days, they weren’t going to happen.  But, I did have my heart set on something sweet which would fit into my current diet and after a little looking around I found this wonderful recipe for Orange-Cardamom Date Bars with a Nutty Crust. 

1426136_10152080801216663_979848146_n I made only one small ingredient change to better fit our diets and I simplified the process of making the bars.  The bars are delicious and sweet with no added sugar or sweeteners and the flavor of the orange and cardamom works perfectly with the flavors of the nuts and dates.  Even though there’s no cooking or baking involved, the nuts make a wonderful crunchy crust and the date puree in the center is creamy and delicious.  A wonderful little treat if you’re looking for a healthy sweet dessert or snack.

1474647_10152080801431663_582691904_n Orange-Cardamom Date Nut Bars (adapted from here)

Grease an 8-inch-square baking pan with the coconut oil.  Working over the bowl of a  food processor, peel the oranges and remove and discard all the white pith and the membranes.  Add the dates and process to a smooth puree. Scrape the puree into a bowl.  Rinse and dry the processor bowl.  Add the almonds to the empty processor bowl and process until very finely ground. Add the pecans, cinnamon and ground cardamom and pulse until the pecans are coarsely chopped. Add 1/4 cup of the date puree and pulse until the mixture holds together. Using oiled fingers, press half of the nut mixture into the prepared pan in an even layer. Spread the date puree over the crust. Crumble the remaining nut mixture evenly over the filling; pressing down to compact it. Refrigerate for at least 2 hours, until firm enough to cut.

Cut into 24 squares and serve.

Enjoy!

My previous Improv Cooking Challenge entries:


Thursday, August 15, 2013

Dark Chocolate Peanut Butter Rice Krispy Treats with Vanilla Coconut Frosting

Summer is flying by and here we are again, the third Thursday of the month and it's Improv Cooking Challenge time again. Like last month I'm still out of sorts as I'm still without a computer, thus still taking pictures with my iPhone and blogging on my iPad.

This month for the Improv Cooking Challenge our hostess Kristen of Frugal Antics of a Harried Homemaker challenged the participating bloggers to make any recipe of their choosing using the specified ingredients of vanilla & chocolate. Now those ingredients sound easy enough, I mean who doesn't love vanilla and chocolate? My problem in choosing a recipe though is that I'm not eating either ingredient right now and Eammon doesn't need to eat either ingredient so I limited myself to recipes that would appeal to my Maisie. In the end it was Maisie who led me to make Dark Chocolate Peanut Butter Rice Krispy Treats with Vanilla Coconut Frosting.

In the end neither Eammon nor I tried even a morsel of the treats but by the way Maisie and her friends devoured them, I can say that they were a huge success.

Dark Chocolate Peanut Butter Rice Krispy Treats with Vanilla Coconut Frosting

Grease an 8-inch square pan and set aside.

Add 3 TBS. buttery spread and the marshmallows to a microwave safe bowl and heat for two minutes on high. Stir to combine and stir in the peanut butter. Heat for an additional 30-40 seconds and then working quickly, add the Rice Krispies and stir to combine well. Press the mixture into the prepared pan and chill until set.

Once the bars are set, cut into squares but keep them close and together. To make the frosting, combine the remaining 1/2 cup buttery spread, powdered sugar, coconut milk and vanilla bean paste and whisk together until creamy. Drizzle onto the chilled bars.


Enjoy!

My previous Improv Cooking Challenge entries:

July 2013 Peaches & Herbs: Peachy Cola Ribs
June 2013 Fish & Chips: Salt &Vinegar Crab Cakes
May 2013 Cinnamon & Sugar: Cinnamon Bun Cookie Bars
April 2013 Bacon & Eggs: Mini Bacon & Swiss Quiche Cups
March 2013 Carrots & Peas: Mom’s Beef Vegetable Soup
February 2013 Hearts & Flours: Three Ingredient Fudgy Nutella Brownie Bites
January 2013 Bananas & Nutmeg: Baked Bananas
December 2012 Chocolate & Marshmallows: White Chocolate Marshmallow Cranberry Cashew Bark
November 2012 Sweet Potatoes & honey: Sweet Potato Glass Noodles with Honey Garlic Lime Shrimp
October 2012 Oatmeal & Raisins: S’mores Granola Bars
September 2012 Zucchini & Brown Sugar: Zucchini with Onion & Brown Sugar
August 2012 Tomatoes & Peppers: French Fries Hash Browns
July 2012 Corn & Butter: Fritos Crusted Pollock
June 2012 Cherries & Almonds: Dried Cherry Almond Tart
May 2012 Strawberries & Cream: Strawberry Soup
April 2012 Peanut butter & Jelly: Peanut Butter & Jelly Bars
March 2012 Potato & Cheese: Loaded Potato & Buffalo Chicken Casserole
February 2012 Ginger & Carrots: Shrimp & Avocado Salad with Carrot Ginger Dressing
January 2012 Lemon & Sour Cream: Ponderosa Lemon & Sour Cream Tart
December 2011 Eggnog & Cranberries: Eggnog Popovers with Cranberry Butter
November 2011 Pumpkin & Cream Cheese: Praline Pumpkin Cheesecake
October 2011 Caramel & Apples: Caramel Stuffed Apple Cider Cookies


Saturday, October 20, 2012

Marshmallow Pops

IMG_5728eSo what do you make to send to school for a girl’s birthday when she’s allergic to wheat, egg & dairy yet you want something special?  For my Maisie, that special treat was Marshmallow Pops.  Super simple to make, colorful and the perfect treat for my girl!
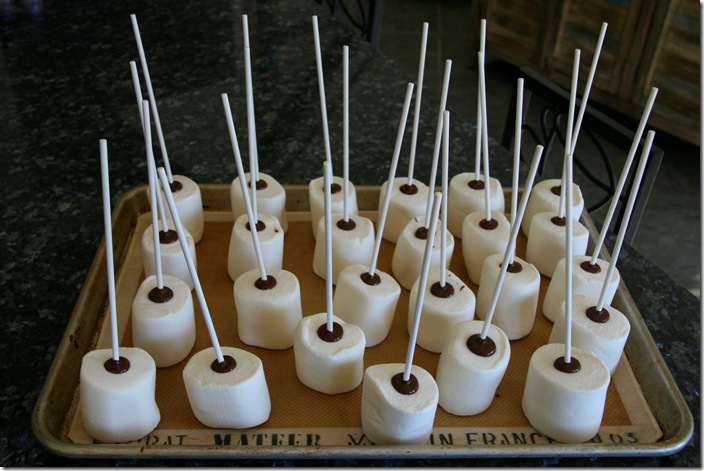
IMG_5718eI first dipped the sticks in some melted chocolate and inserted them in the giant marshmallow.  I allowed them to set so that the marshmallow was securely attached to the stick as I didn’t want them sliding off on the kids.

IMG_5723e After a skim coat of chocolate, and I do mean a skim coat as thick chocolate doesn’t work well on these, I sprinkled the ones Maisie would be taking to school with nonpareils.

IMG_5724e I thought these pops were so fun I decided to make some for her spa birthday party too.  The birthday party ones I sprinkled with jimmies, or sprinkles for you non New Englander’s. 

IMG_5747eBirthday girl Maisie adored her Marshmallow Pops and said that her classmates loved them too.

IMG_5725eMarshmallow Pops

In a microwave safe bowl, melt the chocolate bits with a small amount of coconut oil being careful not to over heat.  Once the chocolate is mostly melted, remove and stir to melt the remaining chocolate.  Add additional coconut oil to thin the chocolate if it is thick but you don’t want it too thin and runny, just nice spreading consistency.  Dip one end of the lollipop stick into the chocolate and then insert into one of the flat ends of the marshmallow, until almost all the way through and place on a tray, stick pointing up.  Once all the sticks have been inserted, place the tray of marshmallows in the refrigerator for 10-15 minutes to allow the chocolate to set so that the marshmallow is securely fastened to the stick.  Once set, one by one, using a small offset spatula, lightly, very lightly, coat the entire surface of the marshmallow with the melted chocolate.  Sprinkle* the freshly spread chocolate with the topping of your choice.  Poke the stick into a block of foam so not to mess up the chocolate and refrigerate the Marshmallow Pops until the chocolate is set.  Once the chocolate is set the pops do well staying at either room temperature or in the refrigerator.

* I found sprinkling the topping on the chocolate worked best, gave me the best coverage and didn’t make the toppings look flat and mashed into the chocolate.

Enjoy!

Thursday, October 18, 2012

S’mores Granola Bars

IMG_5680e This month for the Improv Cooking Challenge our hostess Kristen of Frugal Antics of a Harried Homemaker asked the participating bloggers to make any recipe of their choice using the two given ingredients of oatmeal and raisins.  Sure, oatmeal and raisins sounds easy enough but I just kept going round and round trying to decide what I want to make.  I finally decided to make something special for my Maisie as it’s her birthday month, and I totally can’t believe that she’s seven, so I figured that I’d spoil her even more than usual.  I of course had to keep her food allergies in mind so other than giving her a bowl of oatmeal with raisins, which I do many mornings, I put on my thinking cap to come up with something that she’d enjoy.  In the end it was Maisie, who without even knowing about my dilemma, came right out and told me what she wished I would make and it fit in perfectly with the challenge.  Maisie mentioned that I hadn’t made granola bars for her in a while and that she’d really enjoy some.  In the past I’ve made a couple of different bars for her including Oatmeal, Cashew & Chocolate Granola Bars and Crunchy Oat, Almond, Cashew & Pebbles Granola Bars and though she’s enjoyed both of those recipes and I’ve made them a number of times, she wanted something different.  I told Maisie that I needed to use oats and raisins but I asked her what else she wanted in her bars and she chose the ingredients.  Maisie asked for cashews, chocolate bits and mini marshmallows.  I also gave her a choice of what other cereal to add to the bars and she picked Rice Krispies.  When Maisie mentioned chocolate and marshmallows, my mind immediately thought of s’mores so that’s the flavor I was going after in making these bars.

 IMG_5682eI used what I had in the house, made things up as I went along and in the end I’d say Maisie did a great job with her flavor choices and the bars came together easily as I made them no-bake so super simple to make.  Maisie and Eammon both loved the bars but Maisie did put in a request for next time, more marshmallows and chocolate bits.  We’ll have to see about that one as I tried to keep the “high sugar” items to a minimum but I’ll probably sprinkle the top of the bars with some extra of both next time because if she can see them, she’ll think that there’s a lot more there than there actually is.  In the end, this recipe is a keeper and a great, on the go breakfast or snack for my Maisie.

IMG_5677e S’mores Granola Bars

Prepare a 9 x 13 inch baking pan by lining it with aluminum foil and lightly greasing it with either cooking spray or coconut oil.

In a large bowl mix together the oatmeal, Rice Krispies, raisins, chocolate bits, marshmallows and cashews and set aside.  In a microwave safe bowl combine the coconut oil, honey and brown sugar and microwave on high for 1 minutes.  Remove from the microwave and stir to combine then return to the microwave and cook on high for 2 more minutes.  Remove from the microwave a carefully mix.  Pour the hot mixture over the dry ingredients and using a wooden spoon, mix until everything is well combined and the chocolate bits melt.  Add the contents of the bowl to the prepared pan and press the ingredients tightly into the pan.  Refrigerate for at least 2 hours until the bars are set.  Using the foil liner of the pan, lift the entire sheet of bars from the pan and onto a cutting board.  Remove the foil and cut into bars.  Wrap the bars individually in plastic wrap, parchment paper or wax paper and store in the refrigerator until ready to eat.

Enjoy!


My previous Improv Cooking Challenge entries:

September 2012  Zucchini & Brown Sugar:  Zucchini with Onion & Brown Sugar 
August 2012  Tomatoes & Peppers:  French Fries Hash Browns 
July 2012  Corn & Butter:  Fritos Crusted Pollock 
June 2012  Cherries & Almonds:  Dried Cherry Almond Tart 
May 2012  Strawberries & Cream:  Strawberry Soup 
April 2012  Peanut butter & Jelly:  Peanut Butter & Jelly Bars 
March 2012  Potato & Cheese:  Loaded Potato & Buffalo Chicken Casserole 
February 2012  Ginger & Carrots:  Shrimp & Avocado Salad with Carrot Ginger Dressing 
January 2012 Lemon & Sour Cream:  Ponderosa Lemon & Sour Cream Tart 
December 2011 Eggnog & Cranberries:  Eggnog Popovers with Cranberry Butter 
November 2011 Pumpkin & Cream Cheese:  Praline Pumpkin Cheesecake 
October 2011 Caramel & Apples:  Caramel Stuffed Apple Cider Cookies

Monday, February 6, 2012

Crunchy Fudgy Heart Bites

IMG_3085eAfter a month off because of some administrative and housekeeping changes in how things run at The Secret Recipe Club it’s nice to be back cooking and posting my Secret Recipe Club posts again.  Each month participating Secret Recipe Club members are each assigned a blog from which they can make any recipe of their choosing and this month I was assigned Anne’s blog, Quick and Easy, Cheap and Healthy.  As it works out, Anne has a “Certain Little Someone” who like Maisie has food allergies so right off the top I decided that this month I would make a delicious Maisie “safe” treat.   After perusing the “Allergy-Friendly” section of Anne’s blog I decided to make her Simple Fudgy Bites. 

IMG_3077eMaisie and I made the super simple Fudgy Bites together but as we went along Anne’s recipe got changed a bit.  We started with Anne’s recipe only switching out her sunflower butter for the peanut butter that I already had in the house.  We mixed together all the ingredients and Maisie tasted the “fudge” and said that it was too smooth and needed something.  We added in some ground walnuts, which I have been adding to a lot of recipes lately as I’ve been trying to get some extra healthy calories into all of Maisie’s food.  After the addition of the walnuts Maisie said that it still needed more crunch so a quick look in the pantry and we decided Rice Krispies would be a great crunchy addition.   

IMG_3094eIn the end, Anne’s Fudgy Bites with Maisie’s crunchy additions were a big hit with my girl!

IMG_3082e1Crunchy Fudgy Heart Bites (Adapted from here)

1/4 cup coconut oil
1/4 cup cocoa
1/4 cup peanut butter
1/8 cup honey
1/2 tsp. vanilla extract 
1 cup ground walnuts
1 1/2 cups Rice Krispies

In a food processor blend the coconut oil, cocoa, peanut butter, honey and vanilla extract until smooth.  Pour the mixture into a large bowl and stir in the ground walnuts and Rice Krispies.  Evenly scoop the mixture into a mini heart silicone muffin mold and refrigerate until set.  Press the bottom of each muffin cup to release the Crunchy Fudgy Bites.  Keep refrigerated.

Enjoy!

My previous Secret Recipe Club Recipe Posts:

Texas Chicken with Lime Butter
Pork Belly Soup with Collard Greens
Thin Mint Irish Coffee
Levain Chocolate Chip Walnut Cookies
Welsh Cakes
Nutella CrĂŞpes
Cilantro Lime Chicken
Holy Guacamole
and
Home Style Chicken Curry

Monday, January 16, 2012

Maisie “safe” No Bake Cookies

IMG_3034e Maisie and I switched up her Math Book and Nutella No Bake Cookies so to make them “safe” for Maisie and her allergies and to also add some extra healthy calories to them because with Maisie’s intense workout schedule at the gym she needs all the calories I can get into her.  The cookies in this recipe are gluten-free and vegan so safe for my girl and according to her, absolutely delicious!! 

IMG_3033eMaisie “safe” No Bake Cookies 

1 1/2 cups sugar
1/4 cup cocoa
1/2 cup chocolate soy milk or “milk” of your choice
1/2 cup Earth Balance Buttery Spread or non-dairy margarine of your choice
1 tsp vanilla
pinch of salt
1/2 cup smooth peanut butter or nut or seed butter of your choice
1 cup finely chopped walnuts (optional, added for extra healthy calories)
3 cup Old Fashioned oats

In a microwave safe bowl combine the sugar, cocoa, chocolate soy milk and buttery spread.  Heat in one minute intervals stirring after each minute until the butter is melted and all the ingredients are combined.  Once the ingredients are all melted and combined, microwave on high for two minutes.  Remove from the microwave and add the vanilla, salt & peanut butter.  Stir to combine until smooth.  Stir in the walnuts & oats until combined.  Drop by teaspoon or medium cookie scoop onto a Silpat or wax paper.  Refrigerate until they are set.

Enjoy!

Related Posts with Thumbnails