Showing posts with label Christmas. Show all posts

Saturday, April 25, 2015

Coquito ~ Puerto Rican Eggnog

10676177_10153046685346663_4983111553578120045_nYet another holiday treat, finally being posted in April! 

Many years ago we attended a Christmas party where the most popular drink being poured was coquito.  The coquito was smooth, creamy, delicious and honestly you’d swear it didn’t have much, if any, alcohol…until you tried to stand up and walk and then it hit you!   Since that party, this delicious drink has replaced traditional eggnog in our home, making an appearance most holiday seasons.  Coquito is simple to make, but be sure to prepare it at least 24 hours ahead so that the flavors have time to meld perfectly together.  If you’d like to make an alcohol-free version just replace the rum with coconut water.

10917353_10153046685386663_6164941852559348960_nCoquito ~ Puerto Rican Eggnog

Add all the ingredients except the roasted cinnamon, to the jar of a blender and process until smooth and blended.  Pour the contents into bottles and refrigerate for at least a few hours, preferably over night, allowing the flavors to blend.  Shake bottles well before serving.  Serve the coquito cold, as small portions, dusted with some roasted cinnamon. 

Enjoy!

Monday, April 20, 2015

Carrot Cake Cheese Cake Fudge

10365720_10153046685606663_1819659123318443561_nAt one of the local farmer’s markets, there is a vendor who sells fudge, and one of the flavors she sometimes carries is Carrot Cake Cheesecake.  Well, Eammon just adored her fudge so we worked to replicate the recipe at home as a treat over the holidays.  Yes, another holiday recipe which only took us 4 months to finally post!  We dissected the farmer’s market fudge layer-by-layer and noted that the fudge was the cheesecake flavor and the bottom crust, even without any carrots, tasted like carrot cake.  So, we researched all sorts of recipes to finally come up with this one which is indistinguishable from the farmer’s market one he loved.  Though there are a few steps to the recipe, it is simple to execute and the results are worth the time.

10891830_10153046685551663_5817952932113343718_nCarrot Cake Cheese Cake Fudge

For the carrot cake base:

For the Cheesecake Fudge:

Preheat oven to 425 degrees. Line an 8x8-inch baking dish with aluminum foil and grease with butter or coconut oil.  Arrange the Ritz Crackers in a even layer on the bottom of the baking dish, breaking some to fill in all the gaps and overlapping as needed.  In a medium saucepan, bring butter and brown sugar to a boil over medium-high heat.  Once the mixture is at a FULL boil, cook for 2 minutes.  Remove from the heat and stir in the sweetened condensed milk, cinnamon, cocoa,  nutmeg & walnuts.  Pour the mixture over the crackers and bake for 10 minutes.  Set aside to cool while making the fudge.

In a medium saucepan combine the white chocolate chips, butter, salt and condensed milk and heat until melted and smooth. Add the dry pudding mix and stir until the mix dissolves and is smooth.  Add the Marshmallow Fluff and stir until melted and smooth. Pour the melted fudge over the crust and use an offset spatula to smooth. 

Refrigerate until set.  Carefully remove the fudge from the pan and peel back the foil.  Using a sharp knife which has been heated in a bowl of hot water and then wiped dry, cut the fudge into small squares.  Clean the knife between each cut with a dish towel and reheat it as necessary.   Store the fudge at room temperature.

Enjoy!

Monday, April 13, 2015

Peppermint Bark

10277526_10153046692751663_7817962646038635387_nFor some reason we have numerous recipes with pictures, which we never got posted to the blog.  Amazing how life, with all its ups and downs, makes time on the computer less and less available.  Need to try harder to get more recipes up so, we’re going to try and get all these older recipes posted and of course all the new and delicious ones too. 

10891955_10153046692896663_771523828393750984_nThis peppermint bark is super simple and a must-have around the holidays.  Yes, we had it back in December and here it is April and we’re just getting it onto the blog!  What’s really nice is that there’s no real cooking involved, it’s all chocolate, so fun to do as a family activity or with the kids.  Messy fingers all around to be cleaned up by hungry mouths. 

10915190_10153046692981663_6447234773647807361_nPeppermint Bark

Line a baking sheet with a Silpat, aluminum foil, or parchment paper.  Place half of the white chocolate in a microwave safe bowl along with 1/2 a teaspoon of the coconut oil.  Melt in 15 second increments, stirring well after each heating.  Heat and stir until smooth, making sure to scrape down the sides of the bowl so no scorching occurs.  Pour the smooth chocolate onto the prepared pan and using an offset spatula, spread to a thin layer.  Place the pan into the refrigerator until the chocolate is ALMOST set, about 15 minutes.  While the first layer is in the refrigerator, heat the dark chocolate along with 1/2 teaspoon of coconut oil in the same manner as the white chocolate.  Spread the dark chocolate over the almost set white chocolate and smooth with the offset spatula.  Again place in refrigerator to allow the dark chocolate to ALMOST set.  Repeat the process with the remaining white chocolate and 1/2 teaspoon of coconut oil.  Once you spread the final layer of white chocolate and smooth, sprinkle on the Andes Peppermint Crunch Baking Chips and press them gently into the melted white chocolate. 

Refrigerate the bark until completely hardened. Once hardened, remove from the pan and peel off the Silpat, aluminum foil or parchment. Break the bark into pieces as large or as small as you want. If you choose to cut into squares, allow the bark to warm to room temperature.  Take a very long, sharp knife and allow it to warm up in a bowl of hot water.  Wipe the water off the knife and then use it to cut the bark.  Between each cut, wipe the knife and reheat it in the water as necessary.

Enjoy!!

Monday, December 22, 2014

Mexican Hot Chocolate Fudge

1610858_10153046692691663_3928794867538178056_nAnother ~off our usual eating plan~ treat which we made for this Christmas season.  Chocolate fudge is wonderful but the addition of some spiciness just makes it all that much better.  The fudge isn’t too hot or spicy but rather just has a nice little kick.  Make and enjoy!

10620733_10153046692611663_2237191544755392792_nMexican Hot Chocolate Fudge

Line a 9-inch square pan with aluminum foil, or use a square silicone pan, unlined.  Melt the chocolate, condensed milk and marshmallows in a heavy pot.  Remove from the heat and stir in the espresso powder, cinnamon, chili powder, cayenne, salt & vanilla. Pour into prepared pan and smooth the top.  Chill for 2 hours or until firm.  Remove the fudge from the pan.  Remove foil if used.  Cut the fudge into squares. 

Enjoy!!

Monday, December 15, 2014

Fried Fudge

10897797_10153046685461663_8191443314098020644_n Totally off our regular eating plan, but we decided that some Christmas treats were in order this year.  The first of these sugary treats was some super smooth, chocolaty Fried Fudge.  The fudge isn’t actually fried, it’s just made in a fry pan, thus the name.  Simple to make and delicious to eat.  Make it with or without nuts, it’s up to you!

10891714_10153046685421663_1222869253929186518_nFried Fudge

In a heavy fry pan, mix the sugar, butter &  milk together and then bring to a boil.  Reduce heat to low and cook for six more minutes, stirring occasionally. Remove from the heat & add the chocolate chips and nuts. Stir until fudge begins to form and then quickly add the vanilla, stirring to incorporate. Using a tablespoon, drop the fudge onto a Silpat or wax paper. Allow to cool and store in an airtight container.

Enjoy!

Sunday, July 7, 2013

Andes Peppermint Snowball Cookies

IMG_7273e It’s one of my favorite times of the month, it’s Secret Recipe Club time!  This month I was assigned a blog that I have been following F.O.R.E.V.E.R., Katrina’s Baking and the Boys!  Katrina bakes copious amounts of crazy delicious treats for her four boys and husband and everything, and I do mean everything, is delicious looking, drool worthy in fact.  Since Katrina is a baker, I just had to bake and let me tell you, choosing a recipe was beyond difficult because…like I said, everything is drool worthy so I wanted it all.  When I saw her recipes for Andes Peppermint Crunch Shortbread Cookies and Peppermint Snowball Cookies, I knew I had found my recipe.  Katrina made two different, but similar, cookies, both using a shortbread cookie recipe, like a Mexican wedding cookie.  I adore Mexican wedding cookies as they’re so buttery, tender and delicious and I also love mint so I knew this would be a winner.  In both of Katrina’s versions she stirred in Andes Peppermint Crunch Chips but it was how she finished the cookies that differed.  One version she topped the cookie with some of the melted peppermint candy and in the second “snowball” version. she rolled the cookies in powdered sugar.  Katrina stated that she liked the snowball cookies a little more but preferred the stronger mint flavor of the drizzle.  She suggested for a more minty flavor in the snowball cookies, to up the amount of chips so I listened to her and did just that.  Though I actually had both versions of Andes Baking Chips in the house, I chose to use the dark chocolate Andes Crème De Menthe Baking Chips in my cookies.  Also, because I was upping the amount of chips in the cookies, thus upping the sweetness, I changed Katrina’s cookie base somewhat, completely eliminating the sugar. 

The cookies were flakey, buttery, chocolate, minty two bite deliciousness and for us, leaving out the sugar in the cookie base made for a perfect amount of sweetness and balance.  Check out Katrina’s versions or make mine, all three versions make a perfect holiday or anytime cookie.      

IMG_7276eAndes Peppermint Snowball Cookies (adapted from here)

Preheat oven to 375F.

Using a stand mixer cream together the butter, vanilla & salt until fluffy.  Blend in the flour until fully incorporated.  Stir in the Andes baking chips.  Using a small cookie scoop portion out the cookie batter (you can also roll the batter into walnut sized balls) and place onto a Silpat or parchment paper lined baking sheets, placing cookies 1-inch apart.   Bake for 12-15 minutes.  Allow the cookies to cool for a couple of minutes and then remove to a wire rack, placing the cookies close together.  While the cookies are still warm, dust with confectioners sugar. 

Enjoy!

My previous Secret Recipe Club Recipe Posts: 

Paradise Mango Curried Shrimp 
Laura Goodenough’s Apple Coffee Cake 
Loaded Potato Soup
Lemon Almond Biscotti 
Creamy Mints 
Thai Peanut Noodles with Chicken 
Baked Buffalo Chicken Wings 
Fried Green Tomatoes 
Chicken Satay Noodle Salad 
Double Chocolate Mousse Cake 
Candied Popcorn
Fruit, Nut & Poppy Seed Chicken Salad 
Broiled Sushi 
Health(ier) Peanut Brittle 
Crunchy Fudgy Heart Bites 
Texas Chicken with Lime Butter 
Pork Belly Soup with Collard Greens 
Thin Mint Irish Coffee 
Levain Chocolate Chip Walnut Cookies 
Welsh Cakes 
Nutella CrĂŞpes 
Cilantro Lime Chicken 
Holy Guacamole 
and
Home Style Chicken Curry


Secret Recipe Club

Monday, January 7, 2013

Creamy Mints

IMG_6207eDue to everyone being so busy with the holidays, it was decided that the Secret Recipe Club would take December off.  Each month I love participating, posting and seeing what everyone else makes, so I really missed it but with our trip to Savanna for Maisie’s state meet, then two weeks in Aruba, immediately followed by Christmas and then New Years…well it was a good thing.  Now though it’s great to be back again and I’m excited to post and see what everyone else made this month.  We received our January assignment very early, right before Thanksgiving in fact, and I couldn’t wait to check out my assigned blog, Kate’s Kitchen Trial & Errors,  

IMG_6189eI loved browsing through Kate’s blog and non-food related, seeing some pictures of her cutle-patootie baby Winn.  On the food-side, so many of Kate’s recipes called to me and I love that her husband, like me, adores all things lemon so she has a lot of lemony recipes on her blog, all of which I wanted to make.  I mean, check out her lemon shortbread cookies or even more enticing, lemon curd shortbread sandwich cookies…YUM!  Of course with the cold weather her Creamy tomato soup, apple chicken chili, holiday shortbread cookies, and Indian butter chicken all sounded wonderful too.  Then, as my Mom was here when I got my assignment, I almost made Chai biscotti for her as she adores both biscotti and chai so putting them together would’ve make her happy,  Then I thought, Creamy white hot chocolate for my white chocolate loving husband, or how about her creamy corn with cilantro… but I was afraid that I’d eat the entire bowl myself like I can do when I make my, very similar, Creamed Corn with Cheese & Cilantro.  You can see why it was such a tough decision for this month.  In the end I opted for her creamy mints recipe, because they’re a perfect little treat and I made them just in time for the holidays…not that they lasted that long because we couldn’t stop eating them…each-and-every-time we walked by them we had to grab one or two.  I will be making these again and again…and I’m thinking lemon next time!

IMG_6185eJust a drop of gel food coloring added at the end gave me a nice variegated minty look.

IMG_6192eKate rolled her mints in superfine sugar but I chose to omit that step and I think that they still look delicious.

IMG_6196e1Creamy Mints (adapted from here) 

  • 6 tablespoons (3 ounces) reduced fat cream cheese, softened
  • 1/4 teaspoon peppermint extract
  • food coloring (optional) -  i used green gel and added it at the end so that it didn’t mix in fully allowing the streaky color variations
  • 4 to 4 1/2 cups powdered sugar 

Using a stand mixer, beat the cream cheese until soft and fluffy, about two minutes. Add the mint and food coloring, if using, and mix until blended. Add the confectioners sugar, 1/2 cup at a time, until it forms a stiff mixture.  Using about 1/2 teaspoon of the mixture. roll into balls and then using the tines of a fork press a pattern into each mint.  Allow the mints to dry for a few hours and then store in the refrigerator.

Makes 6 dozen mints.

Enjoy!

My previous Secret Recipe Club Recipe Posts:

Thai Peanut Noodles with Chicken 
Baked Buffalo Chicken Wings 
Fried Green Tomatoes 
Chicken Satay Noodle Salad 
Double Chocolate Mousse Cake 
Candied Popcorn
Fruit, Nut & Poppy Seed Chicken Salad 
Broiled Sushi 
Health(ier) Peanut Brittle 
Crunchy Fudgy Heart Bites 
Texas Chicken with Lime Butter 
Pork Belly Soup with Collard Greens 
Thin Mint Irish Coffee 
Levain Chocolate Chip Walnut Cookies 
Welsh Cakes 
Nutella CrĂŞpes 
Cilantro Lime Chicken 
Holy Guacamole 
and
Home Style Chicken Curry


Secret Recipe Club

Monday, December 31, 2012

Top 12 for 2012 ~ Cook Lisa Cook’s Favorite Recipes

Cook Lisa Cook 2012 year in review On my Moments with Maisie blog, each December 31st I do a year in review post of all the things that happened throughout the year.  It struck me that I should do a post of my favorite recipes from 2012, so here is my cooking year in review.

IMG_2438e2January ~  This was my busiest cooking month and there were many wonderful recipes but the one that I’m most thrilled with is my Pork Dumplings with Rice Wrappers.  My Maisie adores dumplings but when we found out that she was allergic to wheat, egg & dairy, she lost her favorite food.  So, when I finally thought to make dumplings using rice wrappers, and she loved them, well I was just thrilled beyond words.  I now make these in large batches and keep them in my freezer so that anytime she wants dumplings, she can have them.

IMG_3287e[4]February ~ There were quite a few recipes that I really loved, including my Baked Egg & Avocado and my Double Chocolate Meyer Lemon Mousse Cake but the recipe that I made over-and-over again the most, so I’m going to call it my favorite, was my Shrimp & Avocado Salad with Carrot Ginger Dressing.

IMG_3672e[2]March ~ My Loaded Potato & Buffalo Chicken Casserole has to be my March favorite because it’s simple, it combines two favorites, loaded potatoes and buffalo chicken and I have been making this dish for years and we never tire of it.  This is one casserole that I always try to keep some portions in the freezer for when we get a craving.

IMG_3721e2April ~ My favorite recipe this month came from my Secret Recipe Club challenge where I made a Fruit, Nut & Poppy Seed Chicken Salad.  I loved the combination of the sweet and tangy fruit and the crunch of the nuts and poppy seeds and and the creamy sweet & tangy dressing.  What I loved even more was that it was a delicious and wonderful way to use some of my “Rotisserie” Chicken.

IMG_3994e[2]May ~ I did very little cooking this month but I did make an off the charts, Totally Outrageous Jalapeno Popper Grilled Cheese Sandwich which no one could get enough of, always wanting more and again & again.

Lacy Cheese CrackersJune ~ I adore cheese and these one ingredient super simple Lacy Cheese Crackers were a huge hit and I have made them dozens of times since and with all sorts of different cheeses, all so delicious.

Cauliflower Crust Pizza July ~ I love pizza but I don’t love all the carbs & calories so I was thrilled to make Cauliflower Crust Pizza which is great tasting, a lot healthier and in my opinion, even better than the high carb & calorie pizza.  This now is my go-to pizza when I have the craving.

Mini Cheesecake Bites 1 August ~ These Mini Cheesecake Bites are a healthier version of the ones my Mom always made when I was growing up and they were always a favorite.  I love that my version are low carb, no added sugar, portion controlled and just as delicious.

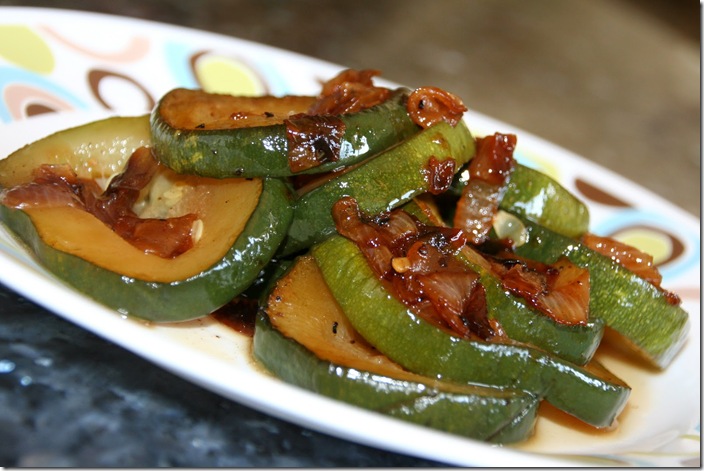
Zucchini with Onion & Brown Sugar September ~ Though I did very little cooking, what I did do all included veggies from our garden.  All the recipes this month were wonderful but I’d have to say that, much to surprise, my favorite was one of my Improv Cooking Challenge recipes, Zucchini with Onion & Brown Sugar.  This was an amazingly delicious dish and a great way to use the bounty of zucchini that arrives each summer.

Baked Buffalo Chicken Wings October ~ As I mentioned in my March favorite, buffalo wings are a favorite in the Cook Lisa Cook home so when I made some fabulous Baked Buffalo Chicken Wings for my Secret Recipe Club assignment, they were a huge hit.  All the heat and flavor of the high fat, fried wings…just a little bit healthier.

Sweet Italian Sausage & Roasted Chestnut Stuffed Mushrooms November ~ I am not a stuffing lover but I do love stuffed mushrooms and my stand out recipe for November was my Sweet Italian Sausage & Roasted Chestnut Stuffed Mushrooms.  A perfect little appetizer and if you eat enough of them, a nice little meal.

Cranberry Almond Oat Breakfast Cookies December ~ My favorite recipe this month is actually the final recipe posted for the year, Cranberry Almond Oat Breakfast Cookies.  No added sugar or fat and they’re egg, flour & dairy free, such a delicious, healthy, easy, grab-and-go breakfast or snack.

It’s been a delicious year in the Cook Lisa Cook home, hope that it’s been the same in yours.  Wishing everyone a happy, healthy and delicious 2013.

Thursday, December 20, 2012

White Chocolate Marshmallow Cranberry Cashew Bark

IMG_6308e About a month ago I posted the following status on Facebook:  “The older I get, the less I enjoy, crave or even want chocolate. What's up with that?”   Most people commented that I must be sick or crazy and stated that they had the complete opposite problem.  I honestly don’t know what it is with me but I just haven’t been in a chocolate mood.  So when I saw that this month for the Improv Cooking Challenge our hostess Kristen of Frugal Antics of a Harried Homemaker asked the participating bloggers to make any recipe of their choice using the two given ingredients of chocolate & marshmallows, I have to say, I was uninspired.  Though I could think of a way to use chocolate in a savory recipe, like my Fruit & Nut Turkey Chili, I just couldn’t work the marshmallows into anything savory.  I looked through dozens and dozens of sweet recipes and though lots of them looked interesting and good, they just left me cold and I couldn’t be bothered to make them. 

I almost decided to skip the challenge this month but I’ve been participating in the Improv Cooking Challenge for the past 14 months and I just didn’t want to break my streak.  In the end I decided to make a simple candy bark in flavors that Eammon would love and using ingredients that I had in the house.  Eammon adores both milk and white chocolate and as I had white in the house, that was the way I went.  I always keep marshmallows in the pantry as Maisie loves them as a little treat and as I was using white chocolate I decided to use the pretty pastel colored ones.  I also wanted something crunchy and chewy in the bark so after a raid on the panty, I chose to add some cashews and dried cranberries.  

IMG_6310eWhite Chocolate Marshmallow Cranberry Cashew Bark

Prepare a baking sheet, covered with either a Silpat, or aluminum foil.  Slowly and carefully melt the white chocolate either in a double boiler or in the microwave being careful not to scorch the chocolate.  Once the chocolate is melted and smooth, mix in the marshmallows, cranberries and cashews and immediately pour onto the prepared pan.  Spread and smooth the mixture as needed.  Refrigerate until the chocolate is set and then either cut or break into pieces.

Enjoy!

My previous Improv Cooking Challenge entries:

November 2012  Sweet Potatoes & honey: Sweet Potato Glass Noodles with Honey Garlic Lime Shrimp 
October 2012  Oatmeal & Raisins:  S’mores Granola Bars   
September 2012  Zucchini & Brown Sugar:  Zucchini with Onion & Brown Sugar 
August 2012  Tomatoes & Peppers:  French Fries Hash Browns 
July 2012  Corn & Butter:  Fritos Crusted Pollock 
June 2012  Cherries & Almonds:  Dried Cherry Almond Tart 
May 2012  Strawberries & Cream:  Strawberry Soup 
April 2012  Peanut butter & Jelly:  Peanut Butter & Jelly Bars 
March 2012  Potato & Cheese:  Loaded Potato & Buffalo Chicken Casserole 
February 2012  Ginger & Carrots:  Shrimp & Avocado Salad with Carrot Ginger Dressing 
January 2012 Lemon & Sour Cream:  Ponderosa Lemon & Sour Cream Tart 
December 2011 Eggnog & Cranberries:  Eggnog Popovers with Cranberry Butter 
November 2011 Pumpkin & Cream Cheese:  Praline Pumpkin Cheesecake
October 2011 Caramel & Apples:  Caramel Stuffed Apple Cider Cookies


Friday, November 9, 2012

Sweet Italian Sausage & Roasted Chestnut Stuffed Mushrooms PLUS a Giveaway from Mrs. Cubbison’s **Giveaway CLOSED**

I recently received a sample package from Mrs. Cubbison’s and you have the opportunity to receive an even better gift package!  Check out what I made with their Mrs. Cubbison’s Classic Dressing and then there’s info on the giveaway at the bottom of the post.

IMG_6085eI was asked recently to try a Mrs. Cubbison’s product and use it in an original recipe.  They sent a sample package which included a box of Mrs. Cubbison’s Classic Dressing.  Well with Thanksgiving coming up I figured that everyone would have a one track mind thinking and stressing about whether to make stuffing inside their turkey or dressing in a side casserole.  Honestly I don’t need the stress and just wanted something a bit different, so what better than a nice little appetizer which includes that holiday favorite, stuffing. 

hero_turkeyWhat’s nice about this recipe is that it’s really versatile, so if you don’t want to make stuffed mushrooms, just follow the recipe and use it to either stuff your bird or put it in a casserole dish and serve it as dressing.  No matter which way you go, this is one delicious stuffing/dressing.

STUFF 12-12 OZ CLASSIC DRESSING CARTON 23111698_FINAL_OLWhen I opened the Mrs. Cubbison’s Classic Dressing, it smelled like Thanksgiving with all the herbs and spices already there, I’d bet that this dressing would be delicious on its own but I’m the type of girl who has to always add to a recipe and switch it around, but I found out that there are some who don’t add a thing, other than liquid, to store-bought stuffing mix.  Who knew?    

By the way, do you call it stuffing or dressing?  Well, Mrs. Cubbison's was interested in all these questions, along with some other interesting holiday facts like, do you use store-bought stuffing mix and what do you add to your stuffing?  To find all the answers Mrs. Cubbison’s conducted a Thanksgiving Across America Survey.  Did you know that the number one item handed down from generation to generation is the stuffing/dressing recipe?  It’s a fact that I didn’t know so I guess you learn something new everyday.  I wasn’t part of the survey but I’m going to give you a little insight into the Cook Lisa Cook home as I’m going to answer all the questions here and now.  Click on the Thanksgiving Across America Survey link to see how my answers compared and how your answers compare as well, it’s quite interesting based on gender and where we live.  Our demographics in the Cook Lisa Cook home are, I’m a New Englander, married to a Londoner, our daughter is from China and we live in Georgia. 

Here are my answers to all the survey questions:  

Q:  What is your favorite holiday? 
A:  Thanksgiving as it’s all about family and food.

Q:  To whom or for what will you be giving thanks this year? 
A:  Family and health.

Q:  Who did you spend Thanksgiving with last year? 
A:  Last year it was just me, Eammon, Maisie and my parents.  We had been invited to a friend’s home but I was sick, trying to get over a major case of pneumonia, we just the week prior to Thanksgiving found out that Maisie was allergic to wheat, egg & dairy and I was still trying to find my way with food for her and my Mom wasn’t feeling well so it was just our Intimate group of five.

Q:  Who/where do you go for help with the menu? 
A:  The internet, I love finding new and interesting recipes online but year to year I tend to make our traditional favorites.

Q:  Who were the cook(s) at the Thanksgiving meal you attended last year? 
A:  I did all of the cooking and my Mom helped with a lot of the prep-work. 

Q:  What is the farthest someone has travelled to attend your Thanksgiving dinner? 
A:  My parents travel over 800 miles (round trip) each year to enjoy Thanksgiving with us.

Q:  What are favorite items for the Thanksgiving meal? 
A:  1st: my Spice Rubbed Turkey with Cognac Gravy, 2nd: stuffing,  3rd: my totally awesome Corn SoufflĂ©, all must haves for it to feel, taste & smell like Thanksgiving.

Q:  What are your favorite items for Thanksgiving leftovers?    
A:  A flaky, buttery croissant filled with sliced turkey, stuffing, sweet potato and cranberry sauce and for Eammon, turkey dump soup which includes turkey, all the leftovers including the veggies, stuffing, Corn SoufflĂ© and even the remaining gravy.  Everything goes in his soup but the sweet potatoes and cranberry sauce.

Q:  Which items have been handed down from previous generations at your Thanksgiving?  
A:  Though my Mom is an awesome cook and made fabulous Thanksgiving meals when I was growing up, I don’t use any of her Thanksgiving recipes.  But check out her “Grandma’s Teriyaki Steak” recipe as it’s one of Maisie’s favorite meals.

Q:  Do you make your stuffing from scratch or do you use store-bought stuffing mix? 
A:  I am a store-bought stuffing mix kind of gal.  I guess I get that from my Mom as she’s the same.

Q:  Which term do you use:  stuffing, dressing, both or something else?
A:  I call it stuffing if I stuff it into something but call it dressing if I make it in a casserole dish.

Q:  How do you cook your stuffing?
A:  I cook it on the stovetop and finish it in the oven in a casserole dish.

Q:  What ingredients do you like to add to the stuffing when you cook it? 
A:  Onions top my list and are always included.  Roasted chestnuts, mushrooms and carrots are up there too as favorite add-ins.  Honestly it just depends on my mood, who’s going to be eating it, and the direction I want to go. 

Q:  Did you do anything special last year to prepare the turkey? 
A:  For the second year in a row I made my Spice Rubbed Turkey with Cognac Gravy, totally awesome, just an all around winning recipe. (check it out!)

Q:  Have you ever had to consider special diets at your Thanksgiving meal? 
A:  Oh yes.  With Maisie’s allergies to wheat, egg & dairy, my Mom’s inability to eat dairy, my Dad’s avoidance of offal, mushrooms, asparagus and sugar, Eammon’s dislike of fruit mixed in with anything savory and me trying to not eat too many processed foods, carbs or sugar, preparing the meal is…well interesting.  I try to go simple with my recipes and we don’t all eat every item made and served but we all have our favorites which have to be made or it just doesn’t feel like Thanksgiving.  Other than Maisie because of her allergies, we all cheat a bit with what we should and should not have but hey, it’s a holiday and only once a year so we indulge a little and enjoy!

Q:  What special diets have you had to consider? 
A:  Gluten-free, lactose-free, diabetic, low carb & picky eaters.

Q:  When do you start shopping for the Thanksgiving meal? 
A:  I would say about a week ahead.  Shelf items I pick up before that if I happen to see them on a good deal.

Q:  Where do you shop for the Thanksgiving meal? 
A:  Just like my usual shopping, most items come from the International/Asian Farmer’s Market.

Q:  How much time is spent in the kitchen preparing the Thanksgiving meal? 
A:  I usually start a couple of days ahead, so to spread out the work and have everything prepped and ready to go.

Q:  Did guests bring items to the holiday dinner last year or did the host do the whole meal? 
A:  As it was just five of us, me, Eammon, Maisie and my parents, I did the whole meal with my Mom’s help.

Q:  Have you ever snuck in the kitchen and sampled some of the food when no one was looking? 
A:  Heck yea!!  And I don’t believe those people who say they haven’t…I mean with all the delicious smells, who can resist?  Resistance is futile, resistance is futile…

Q:  What is your biggest worry on Thanksgiving?
A:  I don’t really worry or stress as it’s just close family.  I just do my best to get everything out on the table, hot, juicy and delicious and thus far, no complaints…and if I hear any complaints, they’re going to be doing the dishes!!

Q:  Other than the meal, what are your family’s favorite traditions or activities on Thanksgiving.
A:  We’re a lazy bunch, after eating it’s just a relaxing day, maybe a walk around the neighborhood but most likely, a good nap!

So now you know all about Thanksgiving in the Cook Lisa Cook home, enter the giveaway below and let me know about Thanksgiving in your home.  First though, my delicious Sweet Italian Sausage & Roasted Chestnut Stuffed Mushrooms, Enjoy!

IMG_6081eBaby portabella mushrooms stuffed and ready for the oven.  These can be prepared to this point a couple of days ahead then covered and kept in the fridge.  When you’re ready to bake them it’s just a quick 20 minutes in the oven and hot, delicious appetizers are ready to serve.

These mushroom caps were a hit with everyone who tried them and the Mrs. Cubbison’s Classic Dressing had perfect seasonings so no additional herbs, spices, salt or pepper were needed.  I liked that the bread crumbs held up well and didn’t dissolve into mush.  I now look forward to using Mrs. Cubbison’s products again.

 IMG_6091eSweet Italian Sausage & Roasted Chestnut Stuffed Mushrooms

Preheat oven to 400F.  Prepare a baking sheet by covering it with aluminum foil and coating lightly with cooking spray.  Wash and dry the mushrooms.  Remove the stems and place the mushroom caps open side up on the prepared baking sheet.  Finely mince the stems and set aside.  In a large cast iron skillet heat the oil.  Add the onions and cook until they just begin to caramelize.  Add the minced mushroom stems and cook until they are soft.  Add the garlic and cook for an additional minute until the garlic is fragrant.  Add the sausage and breaking it up and mixing it in with the onion mixture, cook until lightly browned and cooked through.  Add the diced chestnuts and the Mrs. Cubbison’s Classic Dressing.  Stir well to mix.  Add the water and toss everything well to get all the dressing moist.  Cover the pan tightly and remove from the heat.  Allow the pan to sit covered and undisturbed for 10 minutes so that all the moisture steams through the dressing mix. 

Fluff up the cooked dressing and using a tablespoon, fill the mushroom caps nice and high with the filling.  Place the filled mushrooms on the prepared baking pan.

Bake for 20 minutes until the mushrooms are tender and the top of the filling is golden brown.

Enjoy! 

Giveaway!!  ***CLOSED***

Sometimes being first pays off as comment #1 is the winner, congratulations Kiy!

Now that you’ve been patient and read to this point, here’s the wonderful package that Mrs. Cubbison’s will provide to one lucky winner, follow the directions below for all the ways to enter.  Entries will be accepted up until 12:00 noon EST on Wednesday November 14, 2012 and the winner will be chosen by random draw.  I will contact the winner via email and they will have 48 hours to contact me with their mailing address.  If there is no contact, after the 48 hours a new winner will be drawn.  US residents only please.

Gift Pack - Cubbison 2012Most of the items pictured will be sent to the lucky winner directly from Mrs. Cubbison’s, a couple items like the Sunsweet and Rhodes products will be in the form of a coupon that will cover the monetary value for those items.*  All around a perfect little prize package especially this time of year.

Required entry:

  • Leave a comment on this post letting me know a little bit about you and your holidays by answering any one of the survey questions which I answered above.

Additional entries:

You can earn up to seven additional entries:  Each item you do counts as one additional entry so please leave a separate comment for each, letting me know that you are already a member or follower or now have done each items.

Wishing everyone a safe, happy, healthy and delicious holiday season.

Disclosures:

This sponsorship is brought to you by Mrs. Cubbison's who we have partnered with for this promotion.

* The giveaway is provided to you by Mrs. Cubbison’s and the prize package will be shipped directly from Mrs. Cubbison’s to the winner.  The address provided to me for shipment will be shared with Mrs. Cubbison’s.
I was provided with a box of products to sample, coupons and items similar to the giveaway package. This is a compensated post but all the views and opinions expressed are my own and based upon my experiences with the Mrs. Cubbison’s products.
Related Posts with Thumbnails