Showing posts with label side dish. Show all posts

Thursday, March 2, 2017

Toasted Cauli-Rice


A number of years ago we started eating Cauli-rice in lieu of regular rice, in an attempt to cut down on carbs and be a bit healthier.  Now whenever "rice" is served in our home, it's almost always a delicious version of a cauli-rice.  This Toasted Cauli-Rice is rich, mild and somewhat creamy, because of the ghee.  Toasting the cauliflower a bit adds just another flavor dimension.  In the picture above, the Toasted Cauli-Rice is served with our Malaysian Chicken Curry, which is quickly made in the Instant Pot.  This is a fast, healthy and delicious meal which we hope you'll try.

Toasted Cauli-Rice
  • 1 large head of cauliflower
  • 1 TBS. ghee (or butter)
  • 1 medium onion, small dice
  • 3 cloves garlic, minced
  • salt & pepper to taste
Wash and dry the cauliflower completely.  Cut into workable size pieces and rice using either the shredding blade of a food processor or a box grater.  Heat a large skillet and add the ghee.  Once the ghee is melted, add the riced cauliflower, onion & garlic.  Cook over medium high heat, stirring once in a while.  Cook until the onions are tender and the cauliflower starts to toast in areas.  Add salt & pepper to taste.  

Enjoy!!

Monday, July 20, 2015

Baked Eggplant with Cumin

10532351_10153291342336663_2312058877109955655_nDelicious, spicy eggplant, ready to enjoy!  We adore eggplant and this recipe is super simple and just a bit different, one of our favorites.
10665140_10153291343001663_7051727479425919510_nSteamed eggplant dusted with spice, ready for the oven.
11159556_10153291342241663_1538632767678329009_nBaked Eggplant with Cumin
Preheat oven to 450F.  Wash and dry the eggplant.  Slit the skin in several places to prevent bursting then steam in a steamer until tender, about 35 minutes.  Allow the eggplant to cool and then cut lengthwise in quarters.  Add the oil to an oven proof baking pan and lay the eggplant slices skin side down.  Sprinkle the eggplant with the paprika, cumin, cayenne,salt, pepper and garlic.  Bake for 20-25 minutes until the eggplant is soft and slightly toasted.
Enjoy!

Sunday, March 9, 2014

Zesty Zucchini Skillet

1546315_10152323888041663_188277114_n Yep, here we are again for another month of the Secret Recipe Club!  Let me tell you, it’s been a rough month.  Atlanta experienced a second ice storm and the kids lost yet another week of school.  Then Maisie had sinus surgery (#4) and didn’t react well to the anesthesia so we added an ER visit post surgery and a longer than expected recovery period.  Follow that up with her getting a stomach virus and the poor little girl ended up missing three full week of school and time in the gym and even one of her gymnastics meets.  On top of that Mama was sick too so nothing much of anything good was happening here at the Cook Lisa Cook home. 

One good and delicious thing though was this Zesty Zucchini Skillet.  This month for my SRC assignment I received Anna’s bcmom’s kitchen.  Anna’s blog is filled with recipes which are good and easy and most can prepared ahead of time so to help make dinner preparation time less hectic.  I found a number of interesting recipes including her Israeli cucumber & tomato salad, an angel hair with broccoli & bacon, which I thought would be fun to do with zucchini pasta, and her butternut & potato bake which I would have done with sweet potatoes instead of white potatoes to better fit in with our diets.  In the end though it was Anna’s zesty zucchini skillet which called our name.  I did make a change to Anna’s recipe in that I used fire roasted tomatoes in place of her chopped tomato and salsa, mainly because that’s what we had available but I’m sure that the original recipe is just as delicious as my version.  Even without the salsa, the cumin gave a bit of zesty-ness and the entire dish had a great balance of flavor.  This dish will be made again and I hope that when you’re looking for an easy and good dish that you’ll make this or check out some of the other recipes Anna has on bcmom’s kitchen.


1920320_10152323792921663_988806747_n Zesty Zucchini Skillet  (adapted from here)

Heat a large skillet over medium heat and add the olive oil and heat until hot.  Add the onion and garlic and sauté until the onions begins to caramelize.  Add the zucchini and the spices and sauté, stirring often for 5-7 minutes or until zucchini are crisp tender.  Add the tomatoes and cook for 1-2 minutes or until heated. 

Enjoy!

My previous Secret Recipe Club Recipe Posts: 

Garlic Seafood in Coconut Milk 
Lamb & Eggplant with Chiles
Fijian Ceviche
Carrot & Sweet Potato Pancakes   
Chicken Burgers with Spinach & Mushrooms 
Paradise Mango Curried Shrimp 
Laura Goodenough’s Apple Coffee Cake 
Loaded Potato Soup
Lemon Almond Biscotti 
Creamy Mints 
Thai Peanut Noodles with Chicken 
Baked Buffalo Chicken Wings 
Fried Green Tomatoes 
Chicken Satay Noodle Salad 
Double Chocolate Mousse Cake 
Candied Popcorn
Fruit, Nut & Poppy Seed Chicken Salad 
Broiled Sushi 
Health(ier) Peanut Brittle 
Crunchy Fudgy Heart Bites 
Texas Chicken with Lime Butter 
Pork Belly Soup with Collard Greens 
Thin Mint Irish Coffee 
Levain Chocolate Chip Walnut Cookies 
Welsh Cakes 
Nutella Crêpes 
Cilantro Lime Chicken 
Holy Guacamole 
and
Home Style Chicken Curry


Secret Recipe Club

Monday, January 27, 2014

Zucchini Noodles Aglio et Olio

Zucchini Aglio et olio 1Who knew that zucchini noodles could be so amazingly delicious!!  We now make these noodles in large batches so they’re always on hand to eat, hot or cold.  What a fabu way to get in your veggies!  We’ve enjoyed the noodles topped with some Bolognese or other sauces but our favorite way to eat the noodles is as a side dish…or late night straight from the fridge…shhhhhhh…  To get the best possible noodles, make sure to take the time to salt, drain and dry the zucchini otherwise you’ll end up with watery noodles.

Zucchini Aglio et olio  Zucchini Noodles Aglio et Olio  (adapted from here)

Spiralize or julienne the zucchini and place in a colander or wire strainer and toss generously with salt until all the strands are lightly crusted.  Allow the zucchini to sit for at least 30 minutes…or a few hours, to help remove the excess water.  Rinse the noodles under running water and then drain well.  Top a dishtowel with paper towels and then spread out the noodles.  Roll the towel up into a cylinder and twist, pushing out as much of the excess water as possible.  Unroll the towel and then place the noodles onto a baking sheet lined with fresh paper towels and spread the noodles out.  Place the tray in the refrigerator for an hour or so and allow the noodles to dry further. 

When ready to prepare the noodles, heat a large skillet over medium-high heat, for about 2 minutes.  Add the coconut oil and when it’s melted, add the almond flour and a pinch of salt.  Sauté, stirring often, until toasty brown.  Remove the almond crumbs to a plate and reserve for garnishing. 

Return the pan to the heat and add the dried zucchini noodles and sauté until just tender, about 2 minutes.  Push the noodles to one side of the pan and reduce the heat to low.  Add the olive oil, garlic and crushed red pepper flakes to the empty side of the pan and stir with a wooden spoon until the garlic is fragrant.  Push the zucchini noodles into the oil and stir gently to coat evenly.  Turn off the heat and stir in the parsley, salt & pepper.  Sprinkle the noodles with the almond crumbs and either stir to combine or leave as a topping.

Enjoy!

Monday, January 20, 2014

Coconut Carrot Soufflé

Coconut Carrot Souffle A delicious personal-sized side dish or grab-and-go snack.  These petite soufflés have all the flavor of carrot cake with the texture of a light baked custard.  With no added sugar it’s decadence with none of the guilt!

Coconut Carrot Soufflé (adapted from here)

Preheat oven to 350F.  Line six muffin cups or custard cups (placed on a baking sheet) with foil cupcake liners.  Place the carrots and carrot juice in a pot and bring to a simmer.  Cover partially and cook until the carrots are very tender.  Remove the lid and bring to a boil.  Cook until all of the carrot juice has been absorbed and evaporated.  Add the carrots and all the other ingredients except for the shredded coconut to a food processor or blender and process until smooth.  Divide the batter equally between the six cups.  Sprinkle the shredded coconut on the tops of the carrot batter.  Bake for 30 minutes, until slightly browned and a toothpick inserted in the center comes out clean.  Allow to cool slightly and then remove the foil liner.  Enjoy hot or cold.  Reheats easily in the microwave.

Enjoy!

Thursday, September 19, 2013

Creamy Mac & Cheese, Gluten, Egg & Dairy Free

Mac & Cheese M-safe2 I swear that the weeks are passing faster than I can keep up as here we are again at the third Thursday of the month and it’s Improv Cooking Challenge reveal day.  Years seem to be passing quickly too as this post is also my 24th reveal in this challenge, so two full years and not a month missed…yay me!!

This month for the Improv Cooking Challenge our hostess Kristen of Frugal Antics of a Harried Homemaker challenged the participating bloggers to make any recipe of their choosing using the specified ingredients of pasta & cheese!  Sounds simple enough but this was a tough one for me but shoot I wasn’t going to miss this month and break my posting streak.  The reason that this month was difficult was, I haven’t been eating pasta in any form, nor have I been eating cheese or any of it’s fake versions, Maisie has her allergies and only eats non-wheat pastas and non-dairy cheese and Eammon, well he eats pasta but doesn’t care for cheese at all.  Then I got to thinking about it and before we found out about Maisie’s allergies, one of her favorite foods was good old mac & cheese.  Well right then and there I decided it was time to make an old favorite for my girl in a Maisie “safe” version so that’s exactly how this recipe came about.  I added one of her new favorites to the dish for some added protein, sweet Italian sausage.  This dish was made exclusively for my Maisie and she just adored it, delighted to have an old and new favorite meal all in one bowl.

Mac & Cheese M-safe1Creamy Mac & Cheese, Gluten, Egg & Dairy Free

Prepare pasta according to box directions.  Once the pasta is tender, drain.  In the now empty pot melt the margarine and whisk in the flax seed, mustard and garlic powder until you have a thick paste.  Whisk in the almond milk until the sauce is smooth and creamy.  Stir in 1 1/2 cups of the Daiya and stir until completely melted.  This may take a while as Daiya cheese takes a lot longer to melt compared to real cheese.    Stir in the pasta and coat with the sauce.  Stir in the remaining 1/2 cup of Dayia and stir to incorporate. Add salt & fresh ground pepper to taste.  Add sliced grilled sweet Italian sausage and serve.  

Enjoy!

My previous Improv Cooking Challenge entries:

August 2013  Vanilla & Chocolate:  Dark Chocolate Peanut Butter Rice Krispy Treats with Vanilla Coconut Frosting
July 2013  Peaches & Herbs:  Peachy Cola Ribs
June 2013  Fish & Chips:  Salt & Vinegar Crab Cakes 
May 2013  Cinnamon & SugarCinnamon Bun Cookie Bars  
April 2013  Bacon & Eggs:  Mini Bacon & Swiss Quiche Cups 
March 2013  Carrots & Peas:  Mom’s Beef Vegetable Soup 
February 2013  Hearts & Flours:  Three Ingredient Fudgy Nutella Brownie Bites
January 2013  Bananas & Nutmeg:  Baked Bananas 
December 2012  Chocolate & Marshmallows:  White Chocolate Marshmallow Cranberry Cashew Bark    
November 2012  Sweet Potatoes & honey: Sweet Potato Glass Noodles with Honey Garlic Lime Shrimp 
October 2012  Oatmeal & RaisinsS’mores Granola Bars   
September 2012  Zucchini & Brown Sugar:  Zucchini with Onion & Brown Sugar 
August 2012  Tomatoes & Peppers:  French Fries Hash Browns 
July 2012  Corn & Butter:  Fritos Crusted Pollock 
June 2012  Cherries & Almonds:  Dried Cherry Almond Tart 
May 2012  Strawberries & Cream:  Strawberry Soup 
April 2012  Peanut butter & Jelly:  Peanut Butter & Jelly Bars 
March 2012  Potato & Cheese:  Loaded Potato & Buffalo Chicken Casserole 
February 2012  Ginger & Carrots:  Shrimp & Avocado Salad with Carrot Ginger Dressing 
January 2012 Lemon & Sour Cream:  Ponderosa Lemon & Sour Cream Tart 
December 2011 Eggnog & Cranberries:  Eggnog Popovers with Cranberry Butter 
November 2011 Pumpkin & Cream Cheese:  Praline Pumpkin Cheesecake
October 2011 Caramel & Apples:  Caramel Stuffed Apple Cider Cookies

Sunday, June 23, 2013

Cheesy Cauli Mashed “Potatoes”

IMG_5922eYears ago I made cauliflower mashed “potatoes” all-the-time and adored them.  I remember making all sorts of varieties and I looked forward to trying all the variations and I always enjoyed them, but for some reason I just stopped making them and I haven’t had them in years.  A few months back I wasn’t feeling great, my stomach was bothering me and my doc recommended eating soft, pureed type foods and one of the suggestions was mashed potatoes.  Though they sounded good, I’ve been trying to avoid carbs so they just weren’t calling my name but then I remembered my Cauli-Mash of the past and instantly I had the craving and knew it would be perfect. 

Such wonderful memories and my Cauli Mash was just as delicious as I remembered.  The ones I made and photographed were pretty basic but at the bottom of the post are a few of the variations I used to make and now that I have “found” my recipe, I’ll be making these again and again. 

IMG_5927eCheesy Cauli Mashed “Potatoes”

Prepare one recipe of Cauli-Rice and cool slightly.  Place the Cauli-Rice in a cloth tea towel (not paper towels as there is too much liquid and they are not strong enough) and wring out as much of the liquid as possible, pushing and twisting on the ball of Cauli-Rice.  In a small microwaveable bowl, heat the heavy cream and butter, until the butter is melted.  Add the warm butter/cream mixture, the wrung out Cauli-Rice and the shredded cheese  to the bowl of a food processor and process until smooth.  Add salt and pepper to taste.

Enjoy!

Variation 1:  Garlic Cauli-Rice  When preparing the Cauli-Rice, mince 4 cloves of garlic, mix it in with the cauliflower before microwaving and cook it in with the Cauli-Rice.

Variation 2:  Loaded Cauli-Mash.  Prepare Cheese Cauli Mashed “Potatoes” and top with crumbled bacon, diced green onions and extra cheese.

Variation 3:  Hot Wasabi Cauli Mash:  Replace the sharp white cheddar cheese with an equal amount of hot wasabi cheddar cheese…YUM!

Saturday, March 16, 2013

Pressure Cooker Balsamic Collard Greens

IMG_6641e I totally admit that I have no earthly clue on how to make a big ol’ bowl of collards look beautiful in a picture, but what I do know is how to make them taste amazing!  This recipe takes five minutes of hands on work, 20 minutes in the pressure cooker and then you’ll be eating some of the most delicious collards you’ve ever tried.  Though I do love me some southern collards rich with bacon, ham hocks and butter, this recipe is much more diet friendly and so packed with delicious flavor, I don’t even for a moment miss those other ingredients.  I hope that you’ll give this recipe a try and trust me, you’ll be licking the bowl.

IMG_6643ePressure Cooker Balsamic Collard Greens

Add the stock, olive oil, tomato paste, balsamic vinegar, Whey Low Gold, salt & pepper to the pressure cooker and stir to mix.  Stir in the onion and garlic.  Add the collard greens and seal the pressure cooker.  Over high heat bring to full pressure and then reduce temperature to low.  Cook for 20 minutes.  Remove the pressure cooker from the heat and either run it under cold water or release the steam via the valve.   Open and stir to coat all the collards with the sauce. 

Enjoy!

Monday, January 21, 2013

Buffalo Cauliflower ~ Baked not Fried ~ Vegetarian Style Buffalo “Chicken”

IMG_6214e I have been on quite the cauliflower binge lately but that’s what happens with it’s a super loss leader at the market and I stock up.  I’ve seen a few recipes for buffalo cauliflower but they’ve all called for frying the cauliflower and well, I’m just not really into frying and part of making Buffalo Cauliflower, in addition to using up some, is to get away from all the fat and grease of Buffalo Chicken Wings, baked or fried.  So, when I saw this Buffalo “Chicken”-Vegetarian Style from The Curvy Carrot, I knew what one head of cauliflower was destined to become.  Well holy hot sauce Batman, this Buffalo Cauliflower was freaking amazing!!  I had my doubts if I’d like the batter on the cauliflower as I’m not a batter person but I really, really loved it.  When baked onto the cauliflower the batter gave both a crunch in places and a nice chewy texture in other places and had a wonderful tangy, garlic flavor…what’s not to love?

IMG_6211eI tried to keep the florets whole as cauliflower can be very delicate and fall apart but for the really big florets I did cut them in half.  I changed very little about the recipe.  I don’t keep buttermilk in the house but I always keep buttermilk powder so I mixed up what I needed and I also don’t use garlic salt so I did a combo of garlic powder and sea salt.

IMG_6217eBuffalo Cauliflower ~ Baked not Fried ~ Vegetarian Style Buffalo “Chicken” (adapted from here)

Preheat the oven to 450 F.  Prepare a baking sheet lined with aluminum foil and spray with cooking spray.  In a large bowl, whisk together the buttermilk, flour, garlic powder & salt, whisking until mostly smooth.  Very gently place the cauliflower in the bowl and lightly toss to completely coat with the buttermilk mixture.  Spread the cauliflower on the prepared baking pan and bake for about 15-18 minutes.  Keep and eye on it as it may start to brown up quickly.

While the cauliflower is baking, rinse out the used large bowl and in it, combine the buffalo sauce and the melted butter.  Carefully remove the hot cauliflower from the oven and add it to the bowl of buffalo sauce and toss gently to coat it as best you can.  Return the coated cauliflower to the baking sheet and place it back in to the oven another 5-8 minutes. Let cool slightly and serve immediately.

Enjoy!

Monday, December 31, 2012

Top 12 for 2012 ~ Cook Lisa Cook’s Favorite Recipes

Cook Lisa Cook 2012 year in review On my Moments with Maisie blog, each December 31st I do a year in review post of all the things that happened throughout the year.  It struck me that I should do a post of my favorite recipes from 2012, so here is my cooking year in review.

IMG_2438e2January ~  This was my busiest cooking month and there were many wonderful recipes but the one that I’m most thrilled with is my Pork Dumplings with Rice Wrappers.  My Maisie adores dumplings but when we found out that she was allergic to wheat, egg & dairy, she lost her favorite food.  So, when I finally thought to make dumplings using rice wrappers, and she loved them, well I was just thrilled beyond words.  I now make these in large batches and keep them in my freezer so that anytime she wants dumplings, she can have them.

IMG_3287e[4]February ~ There were quite a few recipes that I really loved, including my Baked Egg & Avocado and my Double Chocolate Meyer Lemon Mousse Cake but the recipe that I made over-and-over again the most, so I’m going to call it my favorite, was my Shrimp & Avocado Salad with Carrot Ginger Dressing.

IMG_3672e[2]March ~ My Loaded Potato & Buffalo Chicken Casserole has to be my March favorite because it’s simple, it combines two favorites, loaded potatoes and buffalo chicken and I have been making this dish for years and we never tire of it.  This is one casserole that I always try to keep some portions in the freezer for when we get a craving.

IMG_3721e2April ~ My favorite recipe this month came from my Secret Recipe Club challenge where I made a Fruit, Nut & Poppy Seed Chicken Salad.  I loved the combination of the sweet and tangy fruit and the crunch of the nuts and poppy seeds and and the creamy sweet & tangy dressing.  What I loved even more was that it was a delicious and wonderful way to use some of my “Rotisserie” Chicken.

IMG_3994e[2]May ~ I did very little cooking this month but I did make an off the charts, Totally Outrageous Jalapeno Popper Grilled Cheese Sandwich which no one could get enough of, always wanting more and again & again.

Lacy Cheese CrackersJune ~ I adore cheese and these one ingredient super simple Lacy Cheese Crackers were a huge hit and I have made them dozens of times since and with all sorts of different cheeses, all so delicious.

Cauliflower Crust Pizza July ~ I love pizza but I don’t love all the carbs & calories so I was thrilled to make Cauliflower Crust Pizza which is great tasting, a lot healthier and in my opinion, even better than the high carb & calorie pizza.  This now is my go-to pizza when I have the craving.

Mini Cheesecake Bites 1 August ~ These Mini Cheesecake Bites are a healthier version of the ones my Mom always made when I was growing up and they were always a favorite.  I love that my version are low carb, no added sugar, portion controlled and just as delicious.
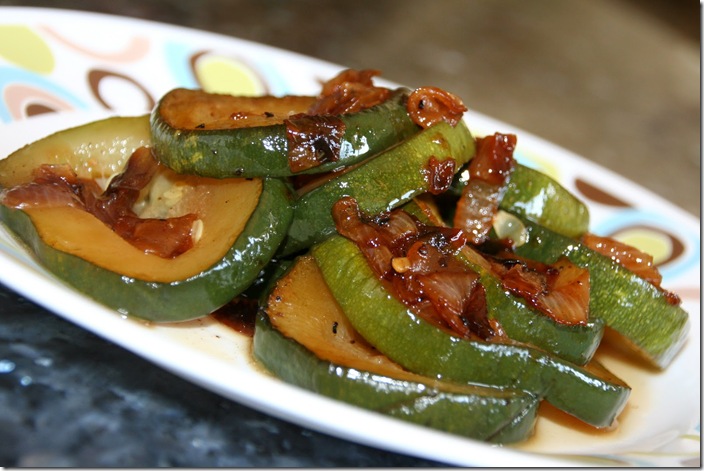
Zucchini with Onion & Brown Sugar September ~ Though I did very little cooking, what I did do all included veggies from our garden.  All the recipes this month were wonderful but I’d have to say that, much to surprise, my favorite was one of my Improv Cooking Challenge recipes, Zucchini with Onion & Brown Sugar.  This was an amazingly delicious dish and a great way to use the bounty of zucchini that arrives each summer.

Baked Buffalo Chicken Wings October ~ As I mentioned in my March favorite, buffalo wings are a favorite in the Cook Lisa Cook home so when I made some fabulous Baked Buffalo Chicken Wings for my Secret Recipe Club assignment, they were a huge hit.  All the heat and flavor of the high fat, fried wings…just a little bit healthier.

Sweet Italian Sausage & Roasted Chestnut Stuffed Mushrooms November ~ I am not a stuffing lover but I do love stuffed mushrooms and my stand out recipe for November was my Sweet Italian Sausage & Roasted Chestnut Stuffed Mushrooms.  A perfect little appetizer and if you eat enough of them, a nice little meal.

Cranberry Almond Oat Breakfast Cookies December ~ My favorite recipe this month is actually the final recipe posted for the year, Cranberry Almond Oat Breakfast Cookies.  No added sugar or fat and they’re egg, flour & dairy free, such a delicious, healthy, easy, grab-and-go breakfast or snack.

It’s been a delicious year in the Cook Lisa Cook home, hope that it’s been the same in yours.  Wishing everyone a happy, healthy and delicious 2013.

Tuesday, December 11, 2012

Crispy Oven Roasted Potatoes

IMG_6179e These are Eammon’s absolute favorite potatoes but because of the calories in them, I make them only for holidays or as a very special treat.  When I make these special potatoes I use a very special ingredient, FAT!!  Yes pure, delicious, culinary gold, saved fat from when I previously made either chicken, duck or even as a last resort, bacon.  I keep containers of rendered fat in my freezer for when I want to make these potatoes or other special recipes.  My favorite fat to use when making these potatoes is the fat skimmed from a pot of Cheaters Chicken Soup as it not only has the rich chicken fat flavor but also all the garlic, onion and other flavors from the “Rotisserie” Chicken and the soup so it gives these potatoes the most delicious flavor EVAAH!! {Sorry, I’m originally from Boston and the accent just comes out every once in a while.}  I have also used pure rendered chicken and duck fat and while not as flavorful, still off the charts delicious.  If you’re not into saving chicken fat, fry up some bacon and use that fat.  Once you try these potatoes you’ll find fried or oven potatoes made with oil…well just boring and bland.  These potatoes are a special treat and oh-so-very worth every.single-calorie!!

IMG_6181eCrispy Oven Roasted Potatoes

Pre-heat oven to 450F.  Line a baking sheet with aluminum foil and lightly coat with oil or cooking spray.  Cut each unpeeled potato into eight pieces or for large potatoes, ten pieces.

Bring a large pot of salted water to a boil and add the potatoes.  Parboil the potatoes for five minutes, until just the outer edge of the potatoes are soft but the potatoes are still raw in the middle.  Pour the potatoes into a colander to drain and toss them around to get the edges roughed up.  Place some of the chicken fat into the now empty, still warm pot and allow it to melt.  Add the drained potatoes to the pot and toss to coat with the melted fat.  Pour the potatoes onto the prepared baking pan in a single layer and place them skin side down.  Roast for 30 minutes.  Toss the potatoes and cook another 10 minutes, toss one last time and cook for a final 10 minutes.  Season with salt & pepper and serve hot.

Enjoy!

Monday, December 3, 2012

Cauliflower with Seared Peppers and Caramelized Onions & Garlic

IMG_6165e1Cauliflower was a recent loss leader at my local market so I’ve been on a cauliflower binge so get ready to see lots of recipes including cauliflower.  Also a recent loss leader were packages of red, yellow and orange bell peppers so they too have been making a showing in a lot of our meals lately.  

IMG_6159eI served this cauliflower dish at our Thanksgiving dinner this year along side the Spatchcocked Turkey.  As I said in previous posts, because we were only a small group, the three of us and my parents and that fact that Maisie, my Mom and I were all sick,  I went simple and easy with our meal and used only the ingredients I had in the house.  With this recipe, I knew what flavors and textures I wanted and I just made it up as I went along.  Thankfully it came out exactly as I envisioned and everyone loved the dish.

IMG_6163eThe dish includes sweet, caramelized onions and garlic, seared sweet peppers and seared and steamed cauliflower.  What really added an additional, phenomenal flavor, was that I used some chicken fat from my Cheaters Chicken soup as the oil/fat for the dish.  While I could have used any cooking oil, butter or even bacon grease, I just adore the flavor that the seasoned chicken fat added to the dish.

IMG_6166eCauliflower with Seared Peppers and Caramelized Onions & Garlic

  • 1 head fresh cauliflower, cut into florets
  • 1 medium onion, thinly sliced
  • 6 large garlic cloves, sliced thinly 
  • 1 cup sliced red, yellow & orange peppers
  • rendered chicken fat, bacon grease or oil of your choice
  • sea salt & fresh ground pepper to taste

Heat a thin layer of fat or oil in a large cast iron skillet over medium-low heat.  Very slowly sauté the onion until it begins to caramelize.  Add the garlic and continue cooking until the onion and garlic is nicely caramelized.  Remove the onion & garlic from the pan, set aside, return the pan to the cook top and turn the heat to high.  Once the pan is really hot add the peppers and sear quickly so that they retain some of their crunch.  Remove the peppers to the dish with the onions & garlic and then add the cauliflower to the hot pan.  Allow the cauliflower to sear a little, stirring when necessary.  When the cauliflower has some toasted bits, add a cup of water to the pan and cover immediately.  Reduce the temperature to medium and allow the cauliflower to steam cook until tender but not mushy.  If there is any water left in the pan once the cauliflower is tender, just pour it off.  Add the cooked onions & peppers back into the pan with the cooked cauliflower and toss gently to mix.  Add salt & pepper to taste.

Enjoy!

Thursday, November 29, 2012

Favorite Fall Recipe - Savory Corn Crumble

Weather wise I am truly a summer person, always telling people that the happiest day of my life was the day I sold my snow blower and moved from Boston to Georgia, thus leaving the snow and super cold weather behind.  Fall though is my favorite time of year when it comes to cooking because I enjoy heating up the house making delicious smelling recipes which warm both the body and soul.  Soups, curries and casseroles are my favorites to make as they generally take little work, feed us for days and are the perfect comfort foods. 

butternut On my Moments with Maisie blog I have spoken numerous times about our garden and though we don’t plant a fall garden it’s late in the summer season is when we get our butternut squash harvest and some years it’s crazy huge so we’re always looking for delicious ways to enjoy the squash like in my Roasted & Curried Veggie Soup.  Ever since I was a little girl I have loved butternut squash so when I was asked by Foodie Blogroll to participate in their Favorite Fall Recipe promotion*** and that it was Savory Corn Crumble with Butternut Squash, Spinach and Feta from Ivy of Kopiaste, well I just had to join in.  I hope that you’ll check out Ivy’s recipe, my easy Roasted & Curried Veggie Soup and though it doesn’t contain butternut squash, one of our favorite comfort food casseroles…just click on the casserole picture at the bottom of the post.  Oh and with our large butternut squash harvest, I’d love if you’d share some of your favorite butternut squash recipes, leave your recipe and or link in the comments. 


Savory Corn Crumble with Butternut Squash, Spinach and Feta, recipe by Ivy Liacopoulou of Kopiaste…to Greek Hospitality

Preparation time: 30 minutes

Baking time: 1 hour

Serves: 1 baking dish (about 12 pieces)

Ingredients:

Filling:

  • 2 lbs butternut Squash, grated
  • 1 lbs spinach, squeezed
  • ½ cup olive oil
  • 2 eggs
  • 1 lbs feta, crumbled
  • ½ cup parsley, finely chopped
  • ½ cup fennel fronds, finely chopped
  • Salt (with caution) and freshly grated black pepper
  • A pinch of cumin

Crumble:

  • 1.5 lbs corn meal
  • 1 cup extra virgin olive oil
  • 200 ml Greek yogurt 2%
  • 4 eggs
  • 1 tbsp salt

Additional ingredients:

  • 3 tbsp margarine divided (to grease the baking tin and to add on top)

Directions:

  1. Grate the pumpkin and mix all the filling ingredients.
  2. In a large bowl add the crumble ingredients and mix using your hand until the ingredients are well blended to form the crumble. If you still see corn meal, add more olive oil, if necessary.
  3. Grease a 35 x 25 cm baking tin with 2 tbsp margarine. Add half of the crumble on the baking tin.
  4. Add the filling on top and sprinkle the remaining crumble on top of the filling.
  5. Add the remaining margarine in small pieces scattered all over the baking tin.
  6. Preheat oven to 180o C / 350o F and bake for about 1 hour or until the crumble is golden on top.

Serve as a main dish, a side dish or a snack.

Below is one of our favorite fall comfort foods though it doesn’t contain butternut squash it’s totally delicious!  Loaded Potato & Buffalo Chicken Casserole, click on the picture to be taken to the recipe.


***This sponsorship is brought to you by GLAM Media who we have partnered with for this promotion.

Enjoy!
Related Posts with Thumbnails